How to Bulk Import New Assets
The Asset Import Tool can be used to bulk import new assets using an Excel spreadsheet
Why use the Asset Import Tool?
Instead of manually adding assets one by one, use the Asset Import Tool to add assets in bulk, saving time and reducing data entry errors.
Data can be easily edited in Excel then saved as a Comma CSV file ready for import.
The Asset Import Tool can also be used to bulk update existing asset records. See How to Bulk Update Asset Information.
Examples of when the Asset Import Tool can be used to add new assets include:
- Your organisation is creating an asset register in FMI Works for the first time.
- Your organisation has purchased a number of assets in bulk, which need to be added to the asset register.
- Your organisation has just commissioned a new building and had handover of the assets resulting from both the construction and fit out. Import these to your asset register efficiently, ready for operations.
Add new or update existing records
The Asset Import Tool will either create a new record or update an existing asset record depending on the following conditions.
- Create – The Asset Name does not match an existing Asset Name in the database. This process is outlined below.
- Update – The Asset Name matches an existing Asset Name in the database. If you would like to update existing information, go to How to Bulk Update Asset Information.
Process overview
There are three steps to the Asset Import process:
Step 1: Download the Asset Import Template.
Step 2: Add the relevant asset data.
Step 3: Upload the completed Asset Import Template.
Step 1: Download the Asset Import Template
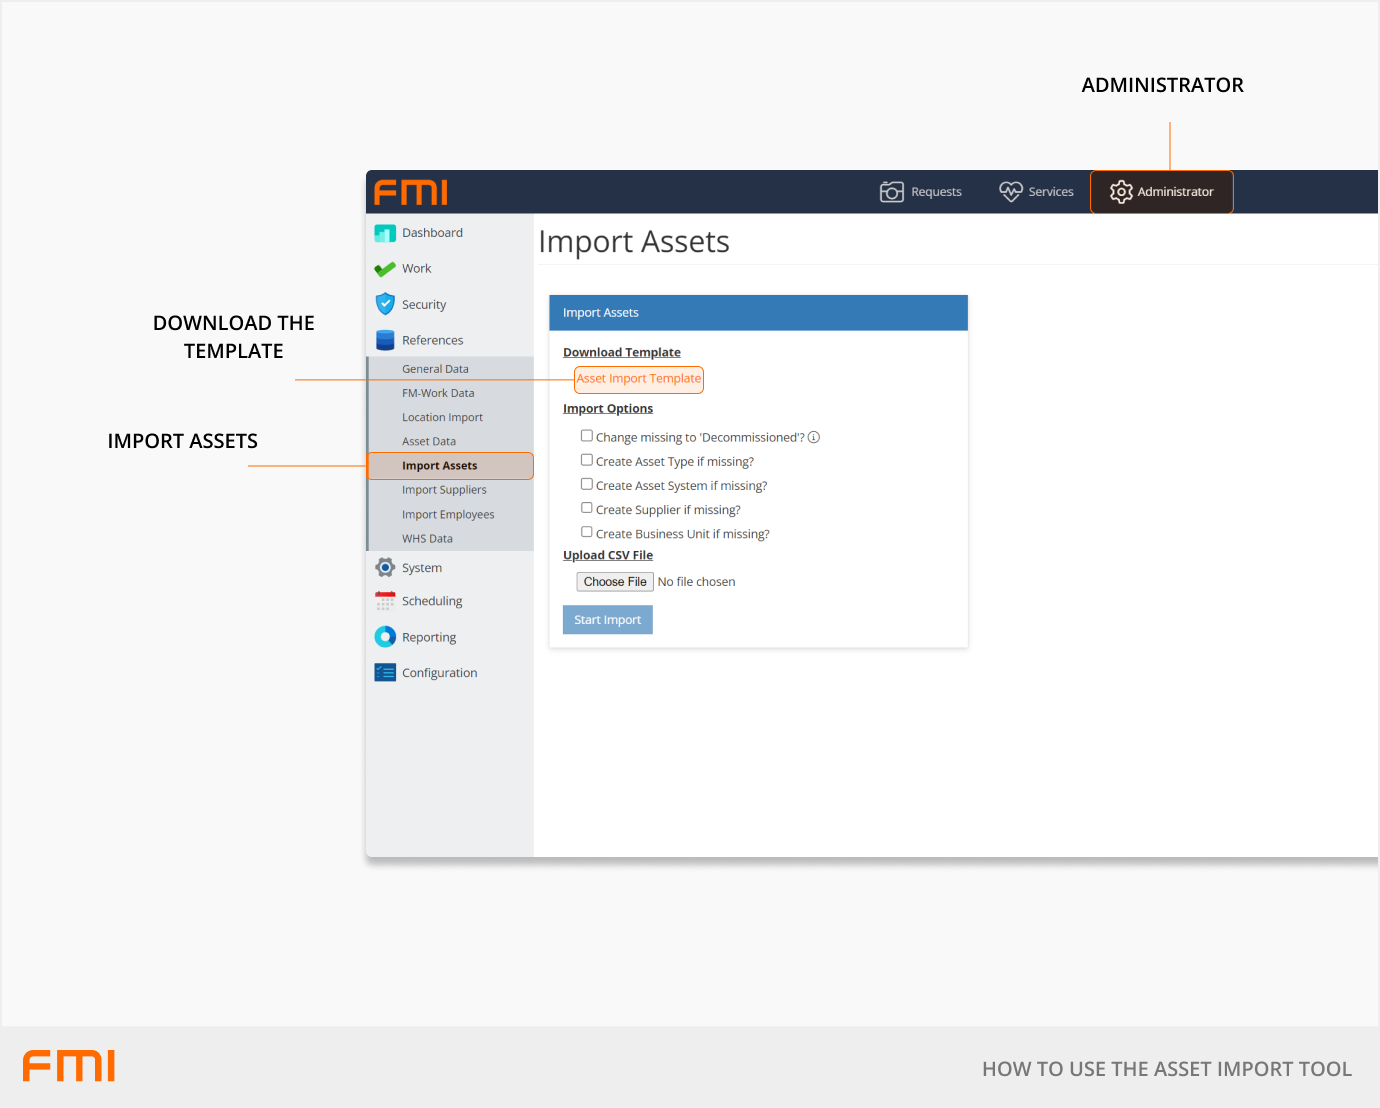
From the Administrator module, go to References > Import Assets.
Under Download Template, click on the link to Asset Import Template. This will be downloaded as an excel file: AssetImport_Template.xlsx.

Step 2: Add asset data
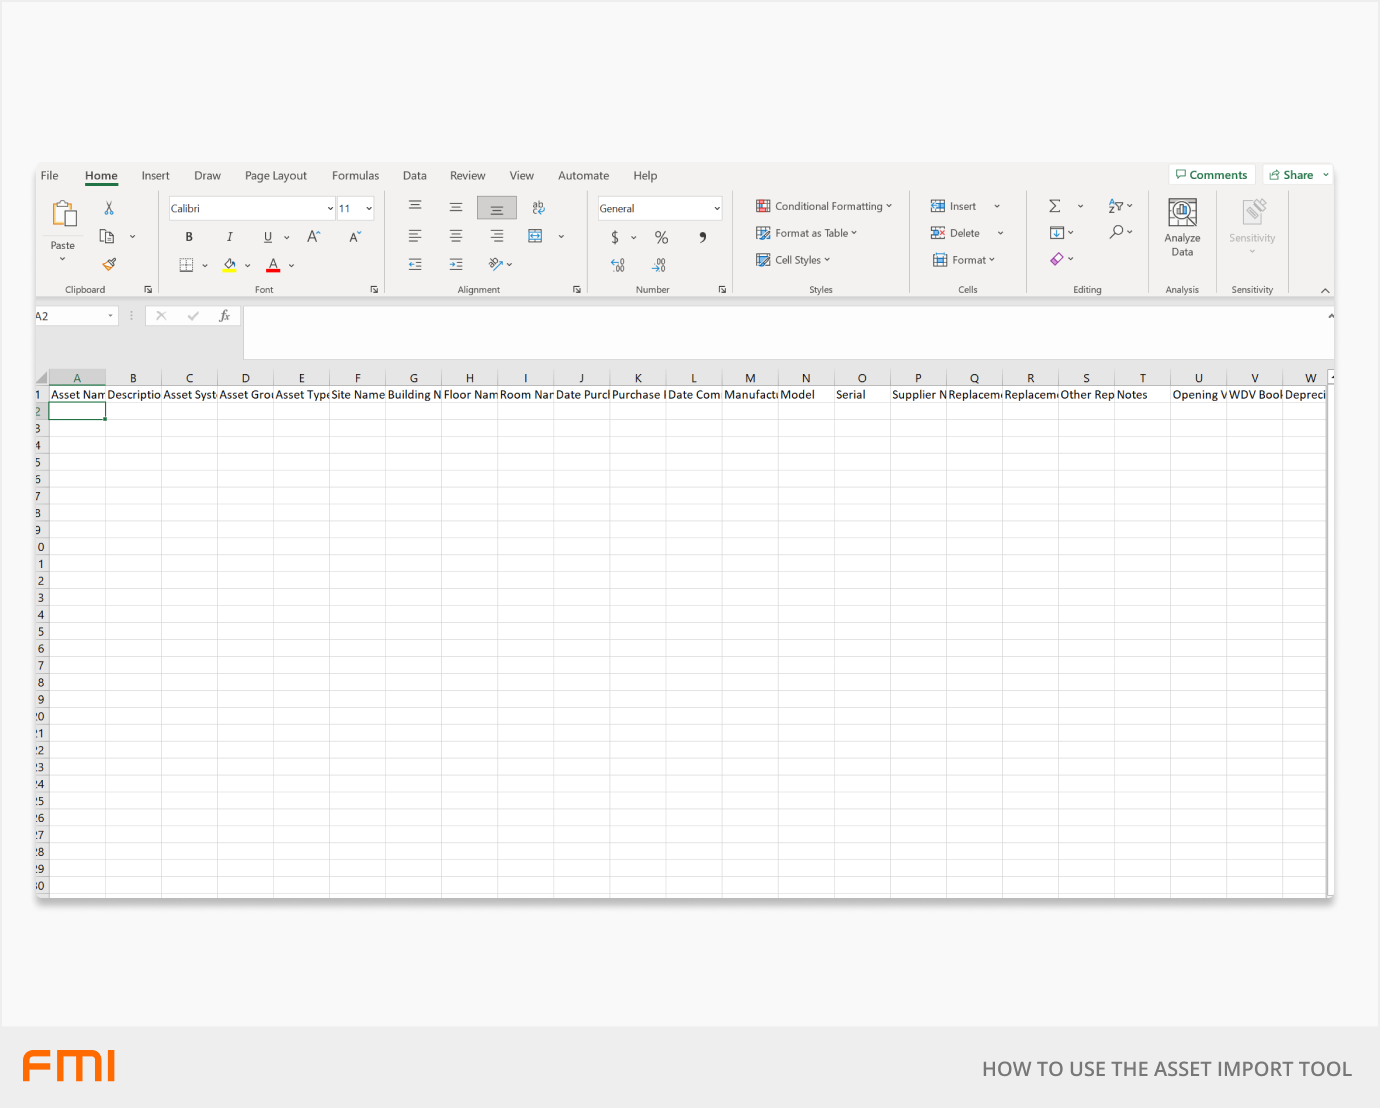
Enter the new asset information into the Asset Import Template Excel file.
Only five of the columns in the template are required to be filled in for a successful import, the rest are optional.
Important: Do not delete, hide, or rearrange any columns within the Asset Import Template, even if they blank.

Mandatory fields
Note: The field ‘Asset Name’ appears as ‘Asset Number’ within FMI Works.
|
Asset Name |
Data in this field will appear as the Asset Number within FMI Works. These characters can be alphanumeric, and each must be unique |
Maximum 50 characters |
|
Asset Group |
This field categorises what kind of asset this is. E.g., Fire & Safety, Electrical Appliances, Fixtures & Fittings |
Maximum 50 characters |
|
Asset Type |
Asset Type further categorises the asset within the Asset Group and is a subset of their group. E.g., If the Asset Group is Fire & Safety, the Asset Type can be Smoke Detectors |
Maximum 50 characters |
|
Site Name |
Enter the site name of where the asset is located. It can be further expanded upon with the optional fields of Building, Floor, and Room |
Maximum 100 characters |
|
Asset Status |
Enter the current status of the asset |
Must be one of the following: 'Active', 'Decommissioned', 'Destroyed', 'Lost', 'Missing', 'Sold' |
Optional fields
It is not required to fill out these fields for a successful import of data, however you may add data in if you wish. You can always add this information later within FMI.
|
Description |
Enter a description of the asset |
Maximum 1,000 characters |
|
Asset System |
A part of the Asset Functional Hierarchy (Asset System > Asset Group > Asset Type) helps further categorise your asset groups and provide more detailed reports. It is an optional categorisation |
Maximum 50 characters |
|
Building Name |
Further narrows down the location of the asset within the site |
Maximum 100 characters |
|
Floor Name |
Further narrows down the location of the asset within the building |
Maximum 50 characters |
|
Room Name |
Further narrows down the location by within a floor of a building |
Maximum 100 characters |
|
Date Purchased |
When the asset was purchased |
Date only YYYY/MM/DD |
|
Purchase Price |
The asset's purchase price |
Decimal Value (18,4) Up to 18 numbers before the decimal, 4 numbers after the decimal |
|
Date Commissioned |
When the asset was installed on site and when a new asset warranty date may commence. Alternatively, you can include the same date as the date purchased |
Date only YYYY/MM/DD |
|
Manufacturer |
The producer of this asset |
Maximum 100 characters |
|
Model |
The model name of the asset |
Maximum 50 characters |
|
Serial |
Serial/identification number of the asset |
Maximum 50 characters |
|
Supplier Name |
Associate this asset with one of your suppliers |
Maximum 100 characters |
|
Replacement Due |
When the asset is to be replaced |
Date only YYYY/MM/DD |
|
Replacement Cost |
The cost to replace this asset |
Enter a monetary value |
|
Other Replacement Costs |
Such as disposal, installation of another asset etc. |
Enter a monetary value |
|
Notes |
Free text notes which appear on the first page of the asset record |
Maximum 255 characters |
|
Opening Value Book |
Do not use |
|
|
WDV Book Date |
Do not use |
|
|
Effective Life Book |
Do not use |
|
|
Depreciation Type Book |
Do not use |
|
|
Depreciation Rate Book |
Do not use |
|
|
Depreciation Asset Book |
Do not use |
|
|
Business Unit |
Part of the organisational hierarchy |
A whole number |
|
Unit Cost |
Cost price of a singular unit |
Up to 18 numbers before the decimal, 2 numbers after the decimal. |
|
Number of Units |
How many units there are of the asset |
Up to 10 numbers before the decimal, 4 numbers after the decimal. |
|
Date Decommissioned |
When the asset reached its end of life or needs to be replaced, this field records the date the asset was physically removed from site |
Date only YYYY/MM/DD |
|
Actual Replacement Cost |
What is the true cost of the replacement of an asset, as this will include disconnection and removal costs? |
Enter a monetary value |
|
Barcode |
Standard barcode format |
Maximum 50 characters (alpha-numeric) |
|
Asset Standard |
Recording the associated international or regional asset management standard, for example, ISO 55000 |
Maximum 255 characters |
|
Owner |
The owner of the asset is associated with a known user in FMI Works. |
Must be a named user already existing in FMI Works. |
Step 3: Uploading the completed template
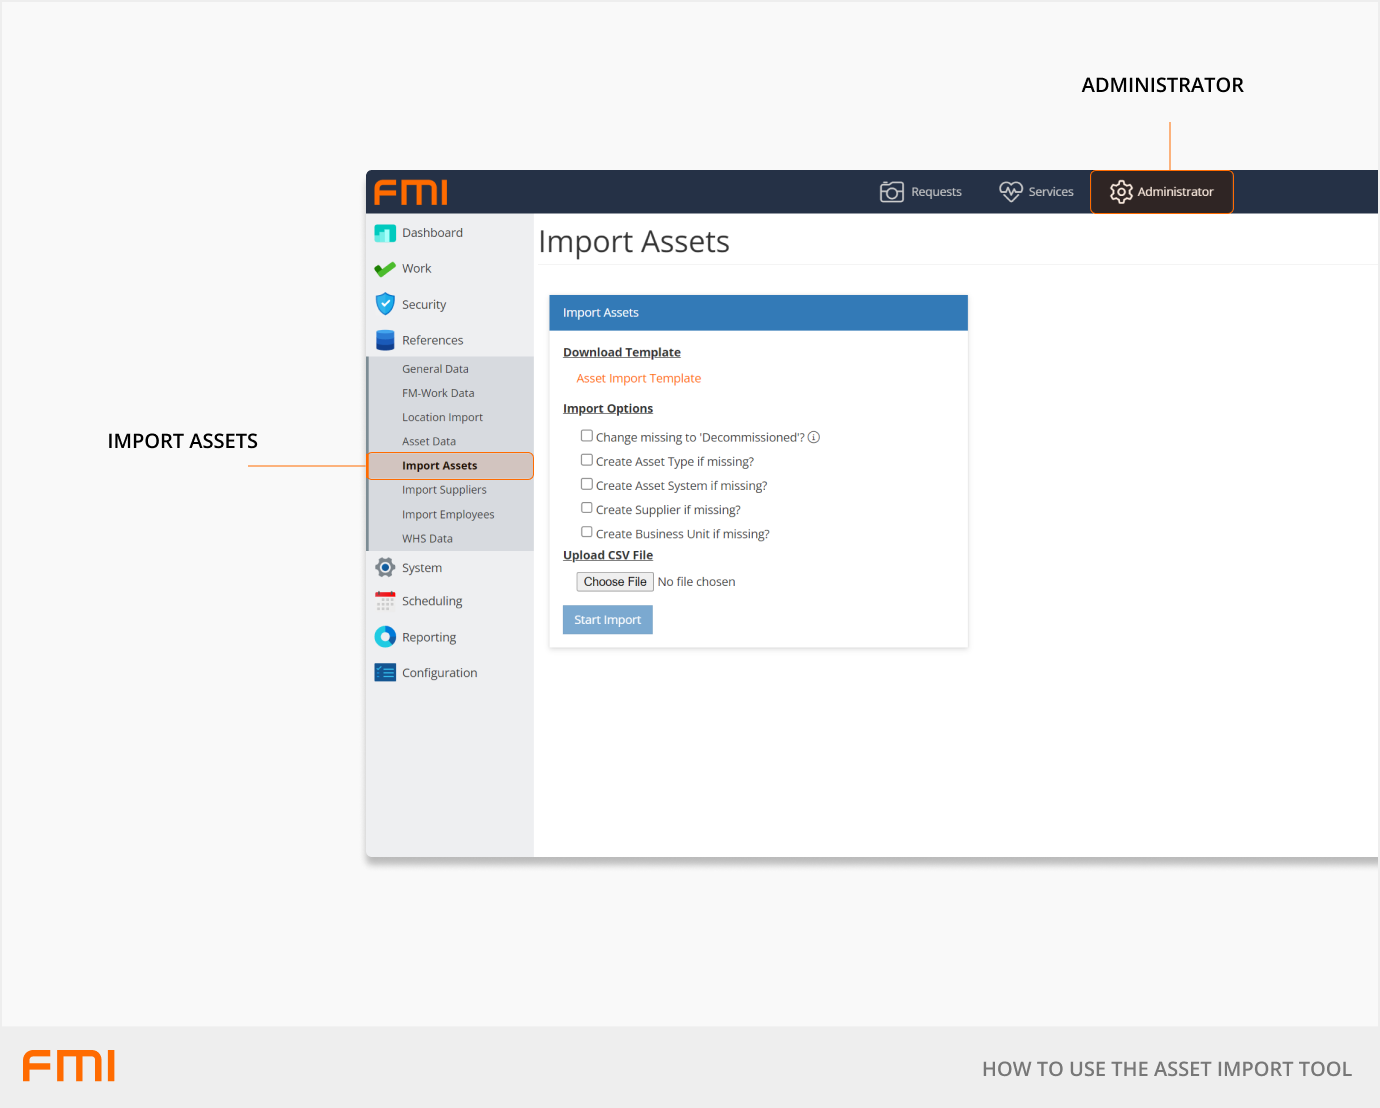
From the Administrator module, go to References > Import Assets.

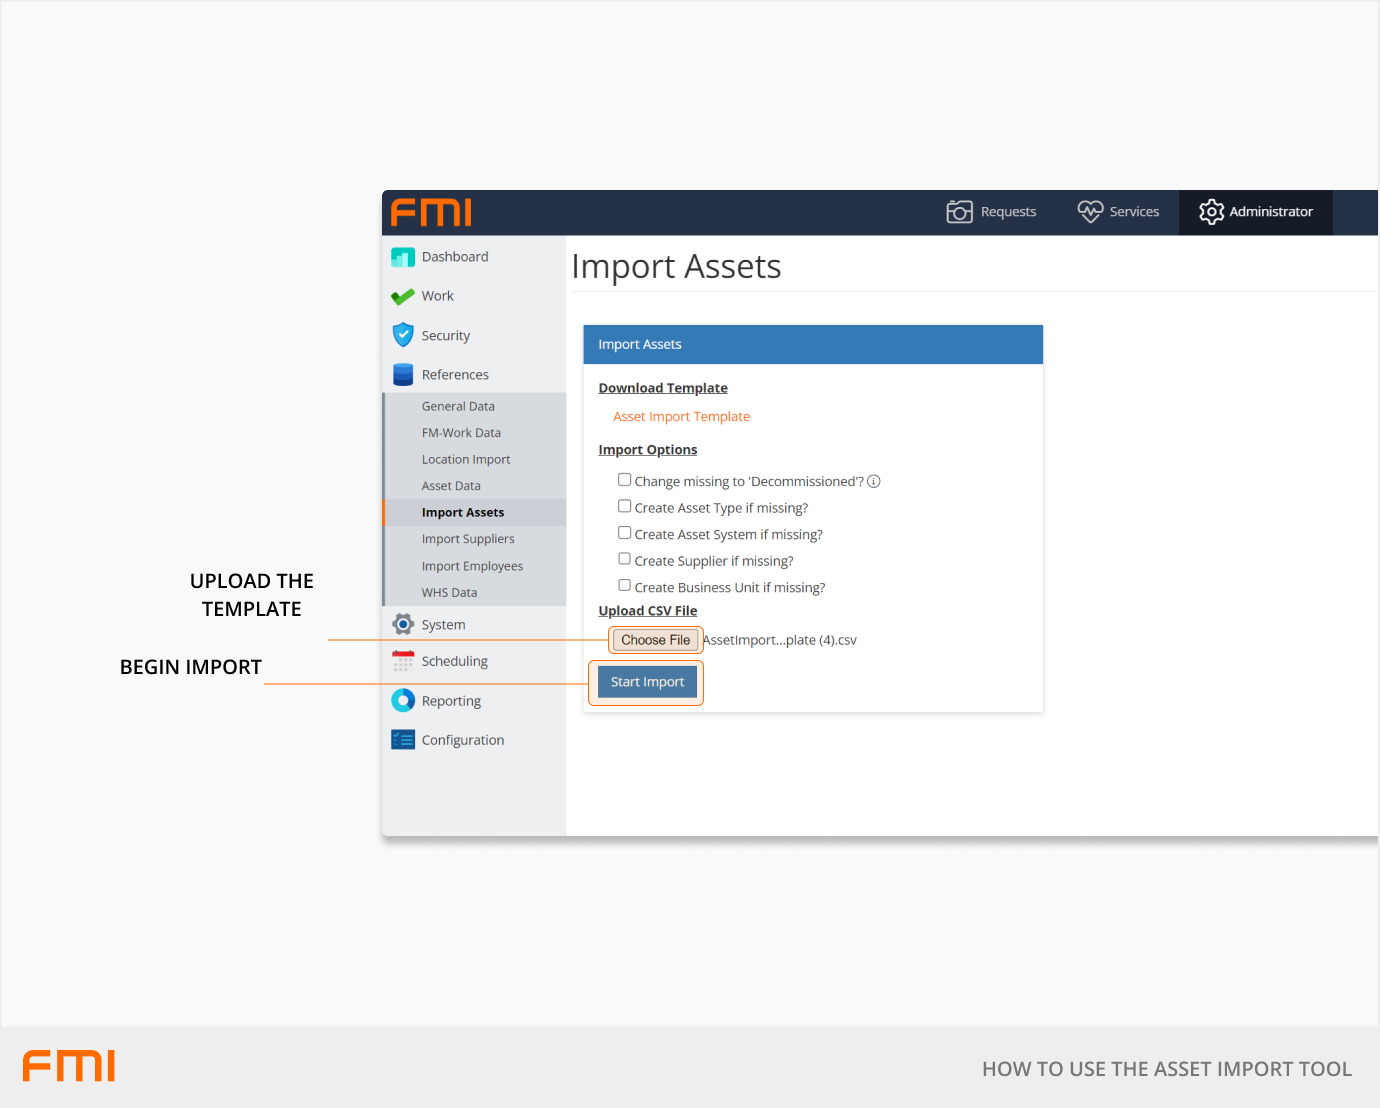
Select the Choose File button under the Upload CSV File subheading and upload the template.

Once uploaded, select Start Import. After a successful import, your asset data will be in FMI Works.
If there is incorrect data in the template, an error will occur with a message stating where the error is. Simply correct the data according to the error, save the template and re-upload.
Contact FMI support if you need further assistance.