How to Bulk Import Suppliers
The Supplier Import Tool can be used to bulk import new suppliers using an Excel spreadsheet
This article is for FMI Works users who have been given the permission of System Administrator
Why use the Supplier Import Tool?
Instead of manually adding suppliers one by one, use the Supplier Import Tool to add suppliers in bulk, saving time and reducing data entry errors.
Process overview
There are three steps to the Supplier Import process:
Step 1: Download the Supplier Import Template.
Step 2: Add the relevant supplier and supplier contact data.
Step 3: Upload the completed Supplier Import Template.
Step 1: Download the template
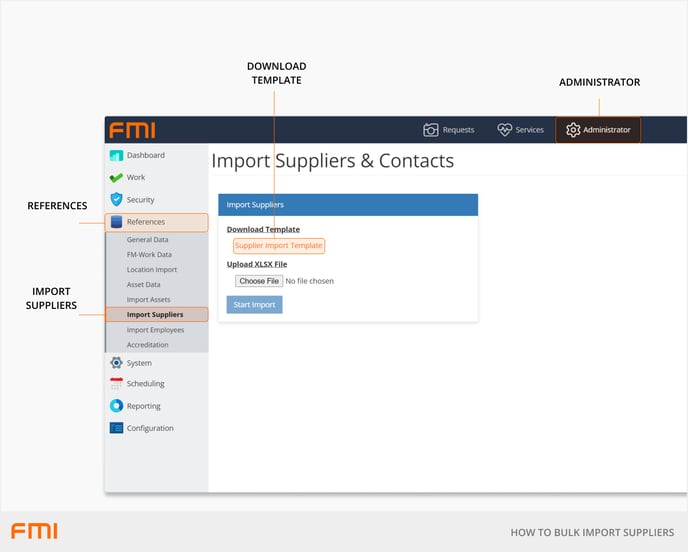
From the Administrator module, select References > Import Suppliers.
Select Supplier Import Template to download the Excel spreadsheet template.
Save the template as a .XLSX file.

Step 2: Add supplier and supplier contact data
Fill in the “Supplier” and “Supplier Contact” template sheets as needed in the Supplier Import Template.
Important: Do not rename the “Supplier” and “Supplier Contact” worksheets. Do not delete, hide, or rearrange any columns within the Supplier Import Template.
Carefully observe the import rules and conditions. If the import conditions are not met, the supplier information will not be imported.
Supplier template: mandatory fields
|
Supplier Name |
Max. 50 characters. Must be unique. |
|
Address Include the full supplier address, e.g., 879 High Street Lot 3 – Suit 2. |
Max 50 characters |
|
Suburb |
Max. 20 characters |
|
Post Code |
Max. 5 characters |
|
State Enter as such, Victoria = VIC, New South Wales = NSW, Western Australia = WA |
Max. 3 characters |
|
Country Enter the country code, e.g. AU = Australia, NZ = New Zealand |
Max. 20 characters |
|
Business Phone |
Max. 50 characters |
Supplier template: optional fields
|
Operation Hours |
Max. 255 characters |
|
Notes |
Max. 2000 characters |
|
Deleted Enter ‘0’ for active, ‘1’ for inactive/deleted |
‘0’ or ‘1’ |
|
Business Fax |
Max. 50 characters |
|
ABN |
Max. 50 characters |
|
ACCNBRI |
Max. 32 characters |
|
ACN |
Max. 50 characters |
|
Website |
Max. 200 characters |
|
Postal Address |
Max. 50 characters |
|
Postal Suburb |
Max. 20 characters |
|
Postal Postcode |
Max. 5 characters |
|
Postal State |
Max. 3 characters |
|
Postal Country |
Max. 20 characters |
|
Ext Compliance ID |
Max. 50 characters |
|
Incorporated Number |
Max. 50 characters |
Sites are optional, however, when adding sites:
- Site names must be entered exactly. For example, Site-1, Site 1 and SITE 1 are not the same.
- The Site column in the Supplier worksheet can contain none, one or more sites and if adding in multiple sites they need to be comma separated entries, for example, Site1,Site 2,Site 3.
- If no Sites are entered the Supplier cannot be selected and allocated work.
- If no Sites have been set up, create the Sites first, before importing Suppliers.
Supplier contact template: mandatory fields
|
Supplier Name The name of the company this person is employed at. It must match what is entered in the supplier template. |
Max. 50 characters. Must be unique. |
|
Name |
Max. 100 characters |
|
|
Max. 100 characters Must be unique |
|
Primary Contact If this person is the primary contact for this supplier, enter ‘1’ or else enter ‘0’. Only one person can be a primary contact, and one user must be designated to be a primary contact. |
‘1’ or ‘0’ |
|
Secondary Contact If this person is the secondary contact for this supplier, enter ‘1’ or else enter ‘0’. |
‘1’ or ‘0’ |
|
Active Active indicates if the person is a current employee for the supplier. Supplier employees are set to inactive when they are no longer employed by the supplier. Setting a user to inactive will stop them from being assigned to work orders. Enter ‘1’ for active’ or ‘0’ for inactive. |
‘1’ or ‘0’ |
Supplier contact template: optional fields
|
Phone |
Max. 30 characters |
|
Mobile |
Max. 30 Characters |
Step 3: Upload the completed Supplier Import Template
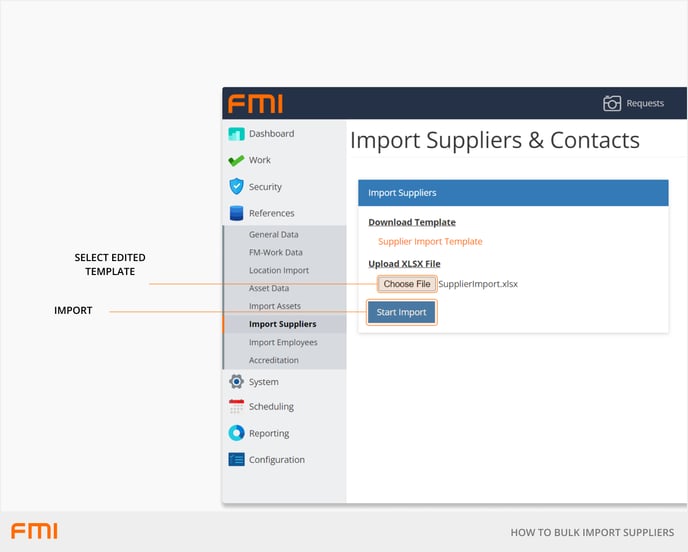
From the Administrator module, select References > Import Suppliers.
1.Select Choose File and navigate to the file directory where the Supplier file is located.2. Select the relevant file, and then Open.
3. Your file name will now display next to Choose File.
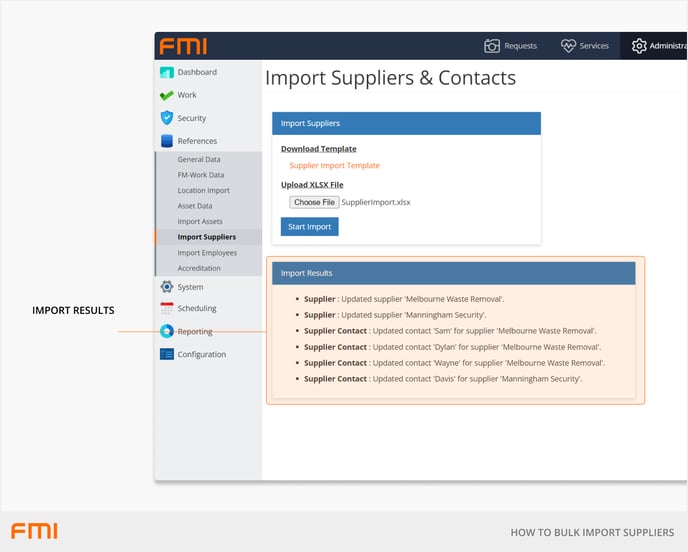
4. Select Start Import. If successful, a message will display.

After a successful import, your asset data will be in FMI Works.
If there is incorrect data in the template, an error will occur with a message stating where the error is. Simply correct the data according to the error, save the template and re-upload.

Tips
- The Supplier Import Tool requires users to have a basic knowledge of Excel.
- We recommend that you use a small sample set of data when using the Supplier Import tool for this first time. This will enable you to review the changes to ensure they align with what you are trying to achieve.
- Supplier records can be added individually through the user interface if desired, rather than using the Supplier Import Tool.
Contact FMI support if you need further assistance.