How to Use Contracts
Manage the procurement of new contracts and the renewal of existing contracts
This article is for FMI Works users who have been given the permission of Works Coordinator
Overview
The Contracts feature provides a central place to store and manage all of your contracts for facilities management. It enables automatic email alerts of key contract dates, such as approaching contract end dates for renewals.
These typically include contractor agreements for maintenance services, but can include any agreement with an expiry date, like insurance renewals.
Getting started
The first step is to add a contract. For instructions, see How to Create a Contract.
Managing the contract procurement process
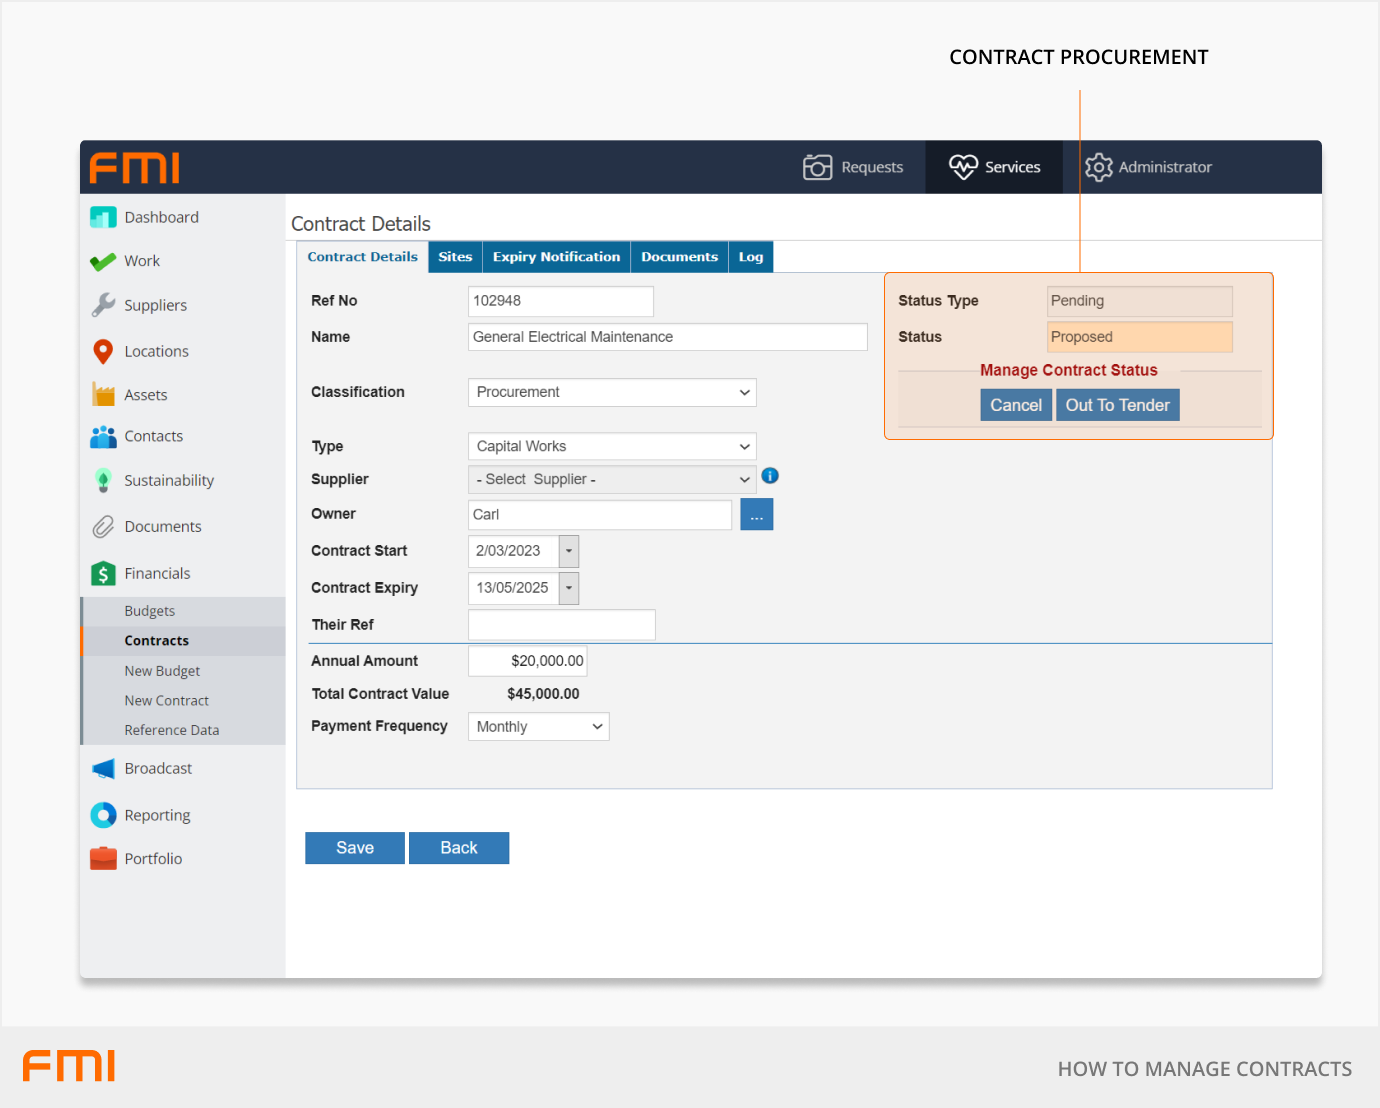
Located at the top right on the Contract Details tab, the Status Type, Status fields and Manage Contract Status allows you to manage the procurement of a new contract from the initial requirements to the selection of a contractor.
Using statuses to track progress
The following Status Type and Status can be used to track the contract procurement process:
Pending > Proposed
Pending > Out to Tender
Active > In Progress
Active > Under Review
Inactive > Expired
Pending > Proposed
This is the first stage of the contract procurement process.
- Status Type > Pending
- Status > Proposed
There are two choices under Manage Contract Status for Pending > Proposed.
- Cancel: the contract process will no longer progress.
- Out to Tender: proceed to the next stage.
Choose one of these options and select Save.
Pending > Out to Tender
At this stage you will be inviting submissions in accordance with your requirements.
- Status Type > Pending
- Status > Out to Tender
There are two choices under Manage Contract Status for Pending > Out to Tender.
- Cancel: the contract process will no longer progress.
- In Progress: the tendering process has finished, and a vendor has been selected.
Active > In Progress
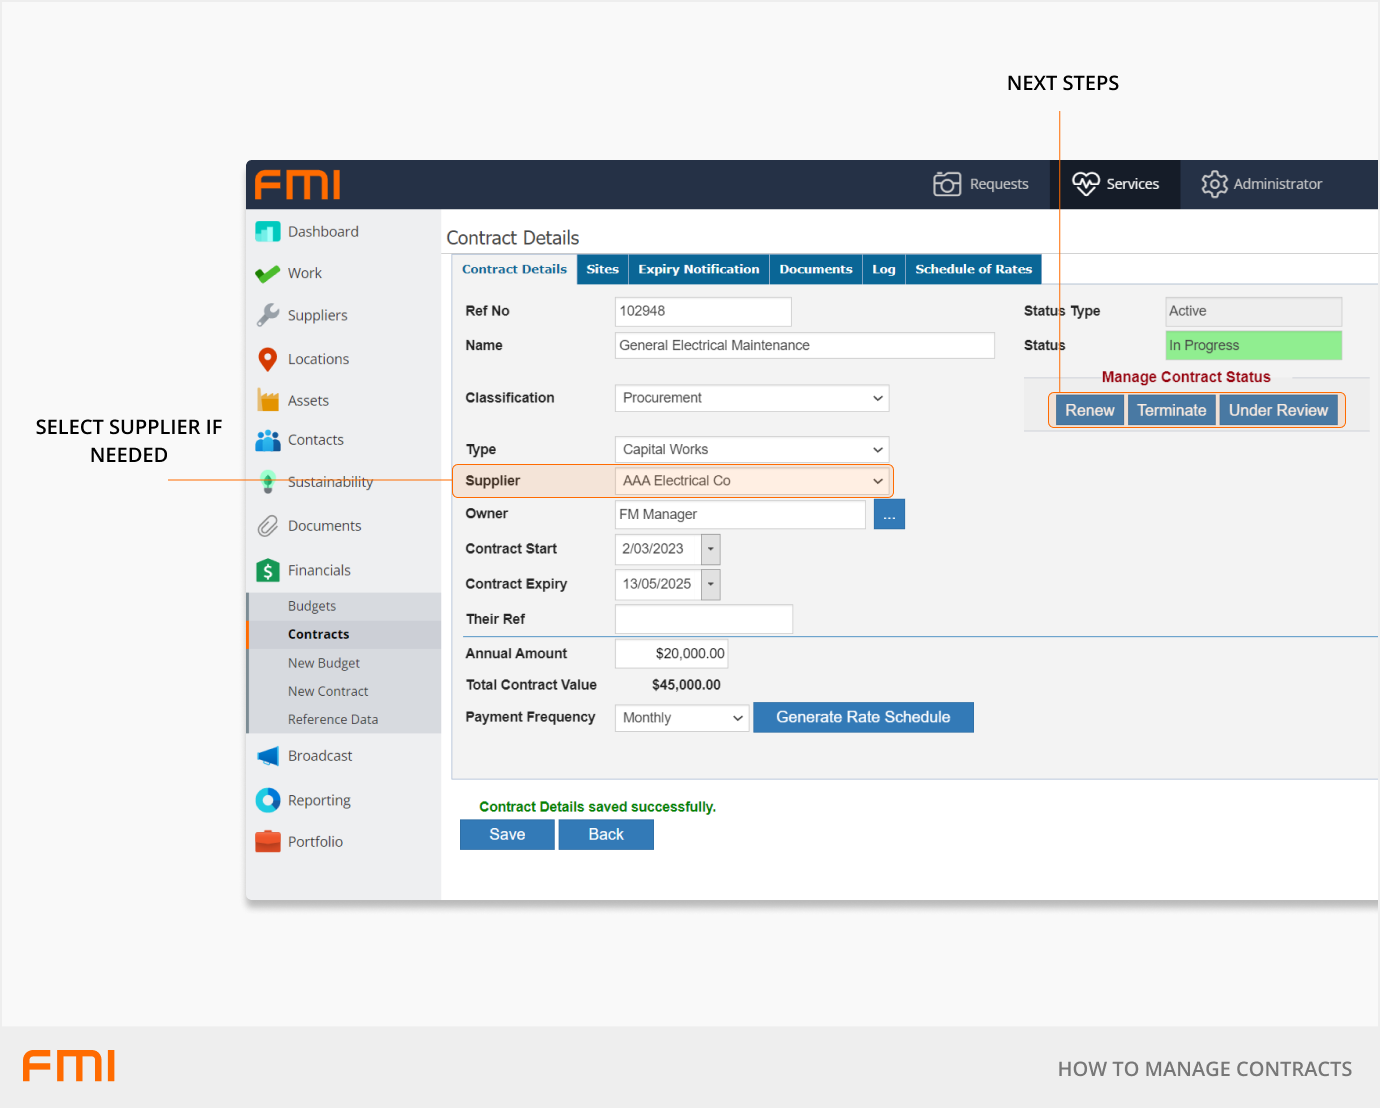
When the status is updated to In Progress, the status type automatically changes to Active.
- Status Type = Active
- Status = In Progress
The successful supplier can be selected in the Contract Details tab. If the successful contractor is a new supplier, you will need to add the supplier first.
The contract can be associated with a budget if cost tracking is desired.
There are three choices under Manage Contract Status for Active > In Progress.
- Renew: activate option to extend the original agreement.
- Terminate: terminate the contract at any point if required.
- Under Review: gives you the opportunity to review the contract before you renew or terminate the contract.
Renew
When you choose the renew option to extend the orginal agreement, the system will ask for confirmation and the reason.
This will be recorded in the history log of who made that change and the reason. Additional documentation can be added into the document section to support this renewal.
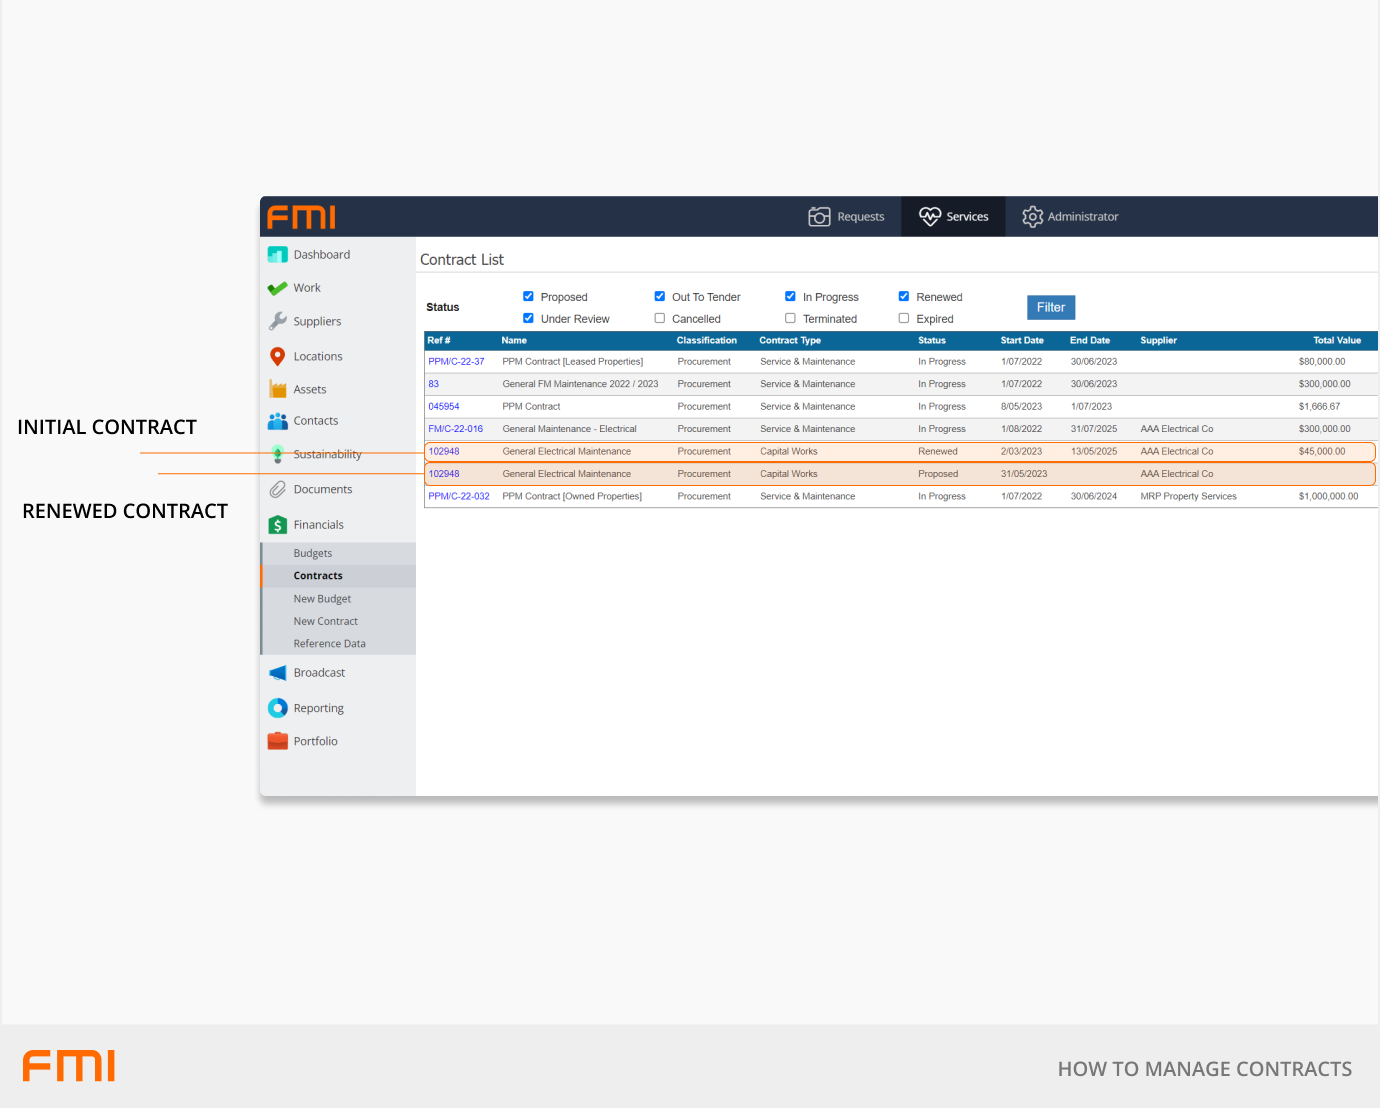
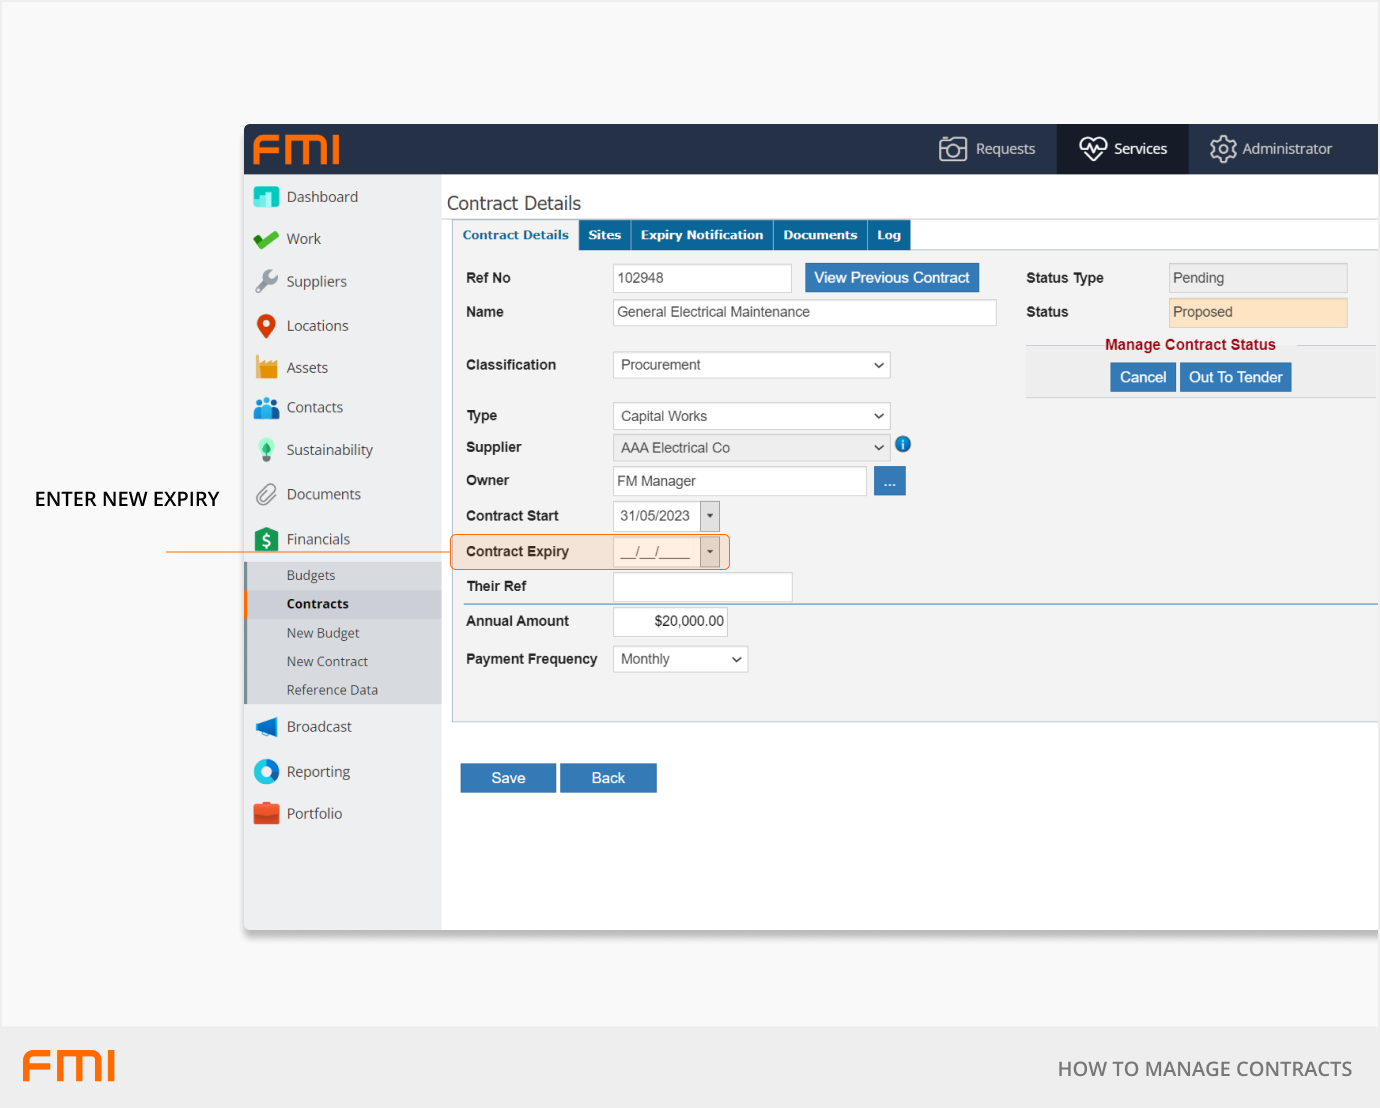
The contract will re-appear in the contract list with the same details, you will just need to update the contract expiry date on the contract details tab to reflect the renewal.
Terminate
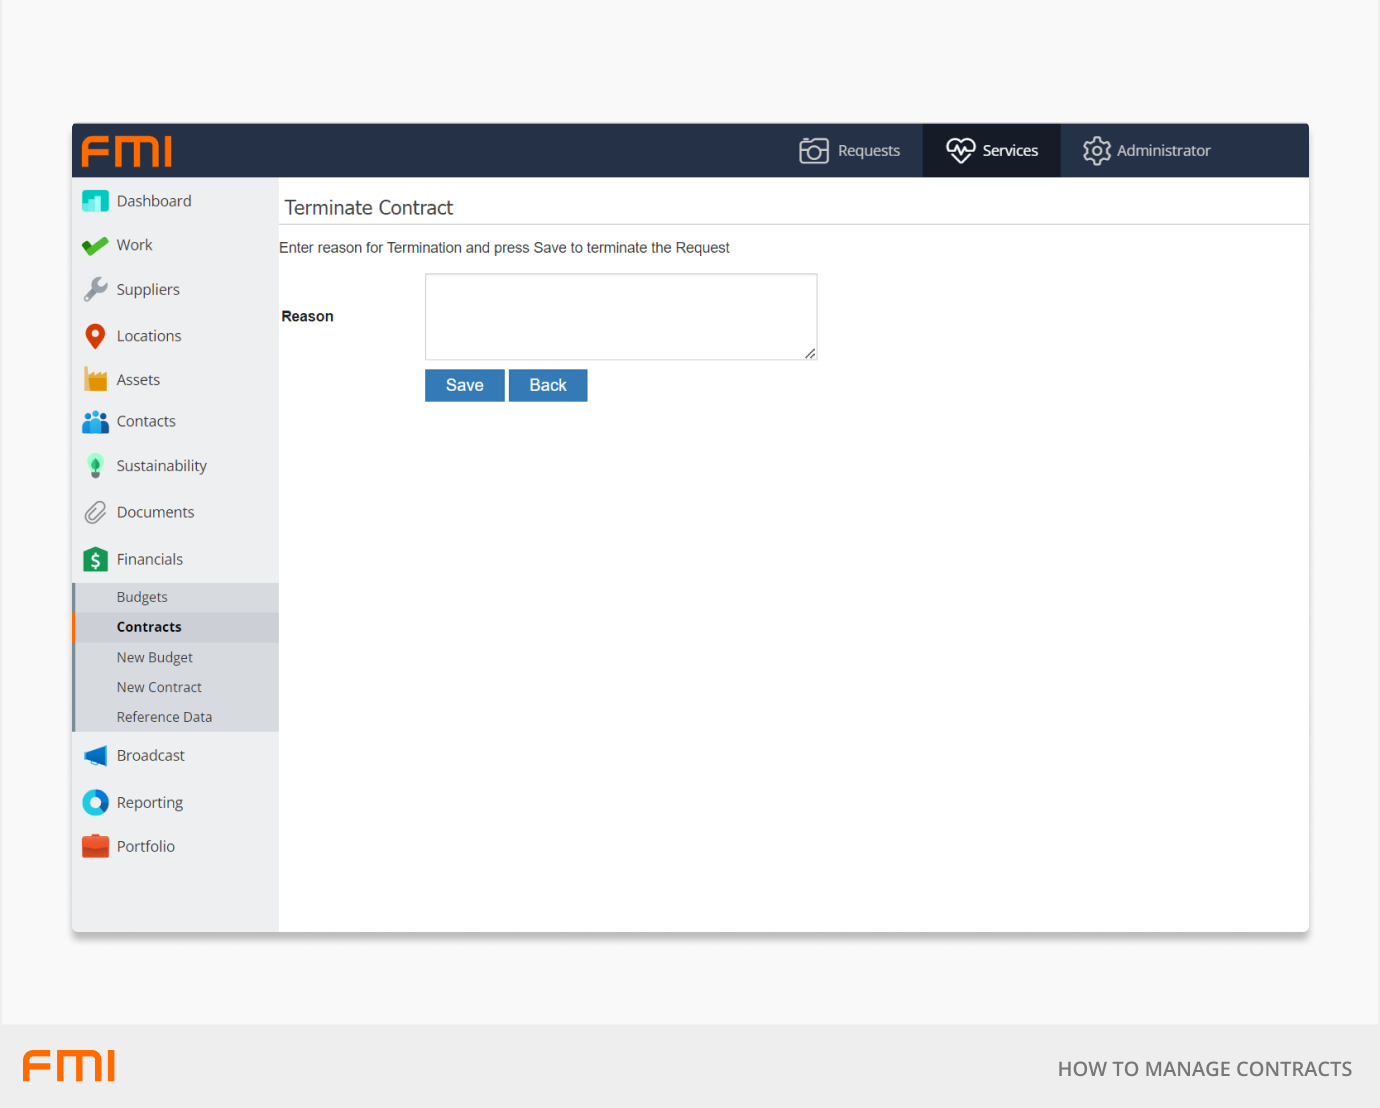
If at any point during the contract there is a requirement to terminate the agreement, you can do so by selecting Terminate. Before doing so, add a note in the log regarding communication from all parties to ensure due process has been demonstrated.
Before the contract is terminated, a field will appear asking for the termination reason. This reason will be displayed in the Log tab.
Under Review
This status gives you the opportunity to review the contract before you renew or terminate the contract.
The system will ask for a reason for the review before changing the status of the contract.
Contract Expiry
The system will automatically set the contract to Expired once it has reached its end date.
- Status Type = Inactive
- Status = Expired
The system will send out five email reminders that the contract is coming up to its expiry date.
There are two choices under Manage Contract Status.
- Renew: if the option exists to renew the contract, even after expiry, this may be used.
- Under Review: if you are in renegotiation discussions this may be used.
Generate Rate Schedule
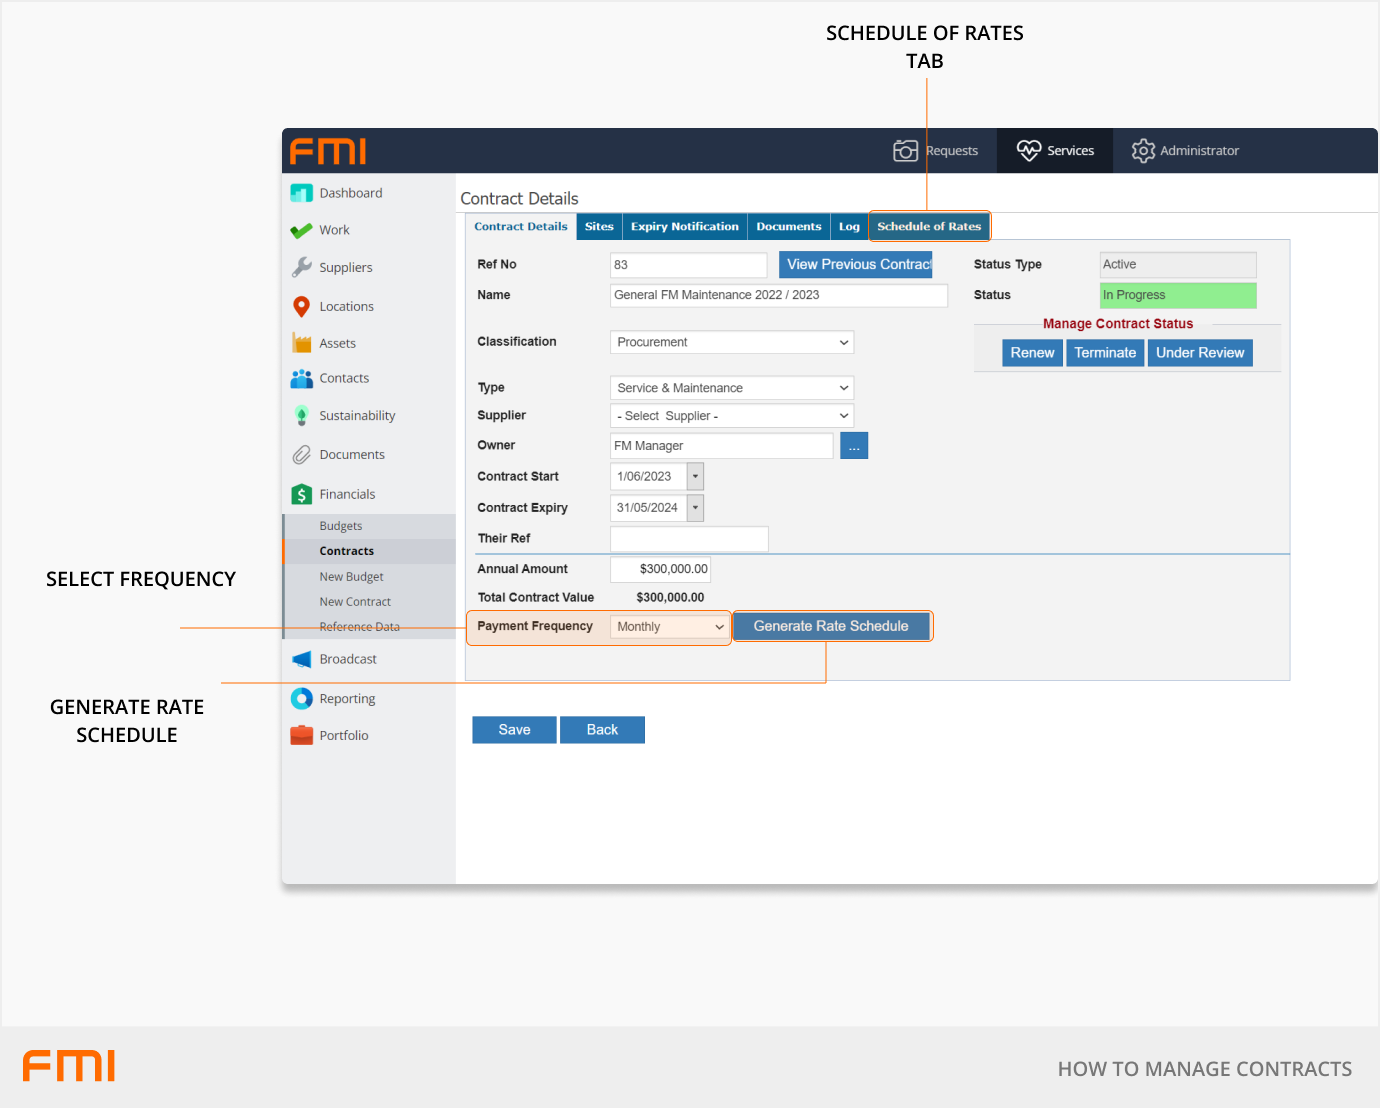
To generate a payment schedule for the contract, add the Payment Frequency on the Contract Details tab to divide the total dollar amount of the contract into sub-amounts over the life of the contract.
Once you have selected the Payment Frequency, select the Generate Rate Schedule button and select Save.
The sub-amounts and payment dates will automatically be calculated and added to the Schedule of Rates tab.
Notify Person
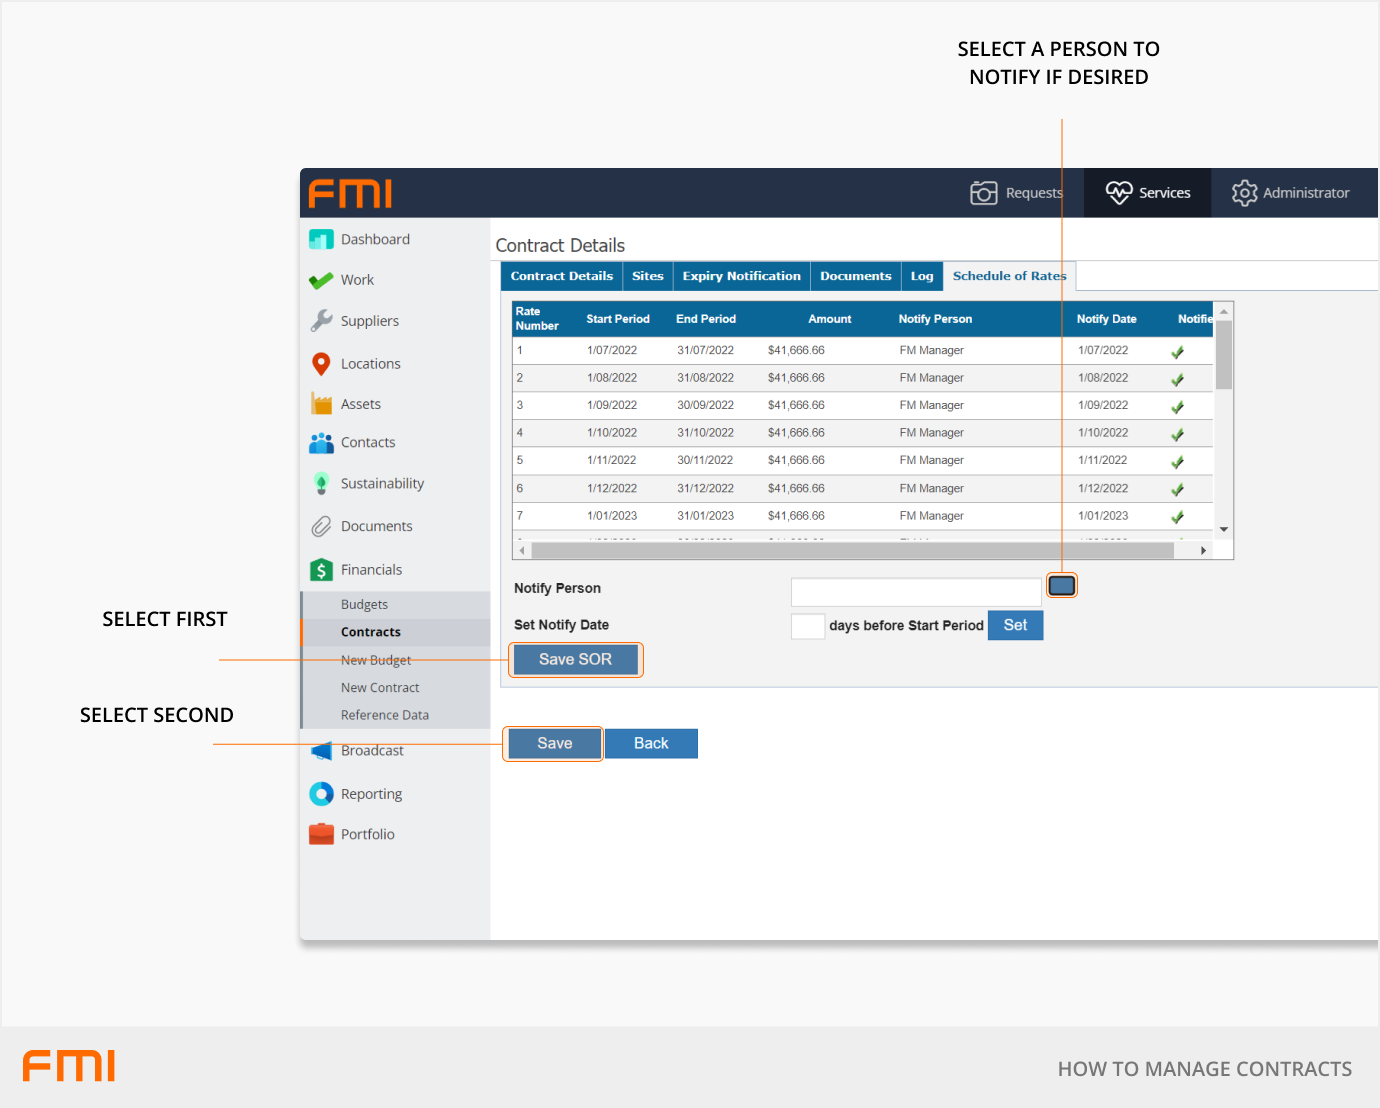
Go to the Schedule of Rates tab and select Notify Person. This is the person who will be alerted when each payment is due.
If you have already selected an Owner of the contract, each payment row will automatically have them as the assigned Notify User. If you want this to be a different user to the owner, remove the Owner before generating the rate schedule.
To update the Notify Person, select the blue button next to the empty Notify Person field and choose the person you wish to be notified of due payments. Select the Save SOR button, then the Save button below that.
If you need to adjust these payments or you have accidently forgotten to remove the Owner because you would like to select another Notify Person, go back to the Contract Details tab, there you will find an option to click on the Regenerate Rates Schedule.
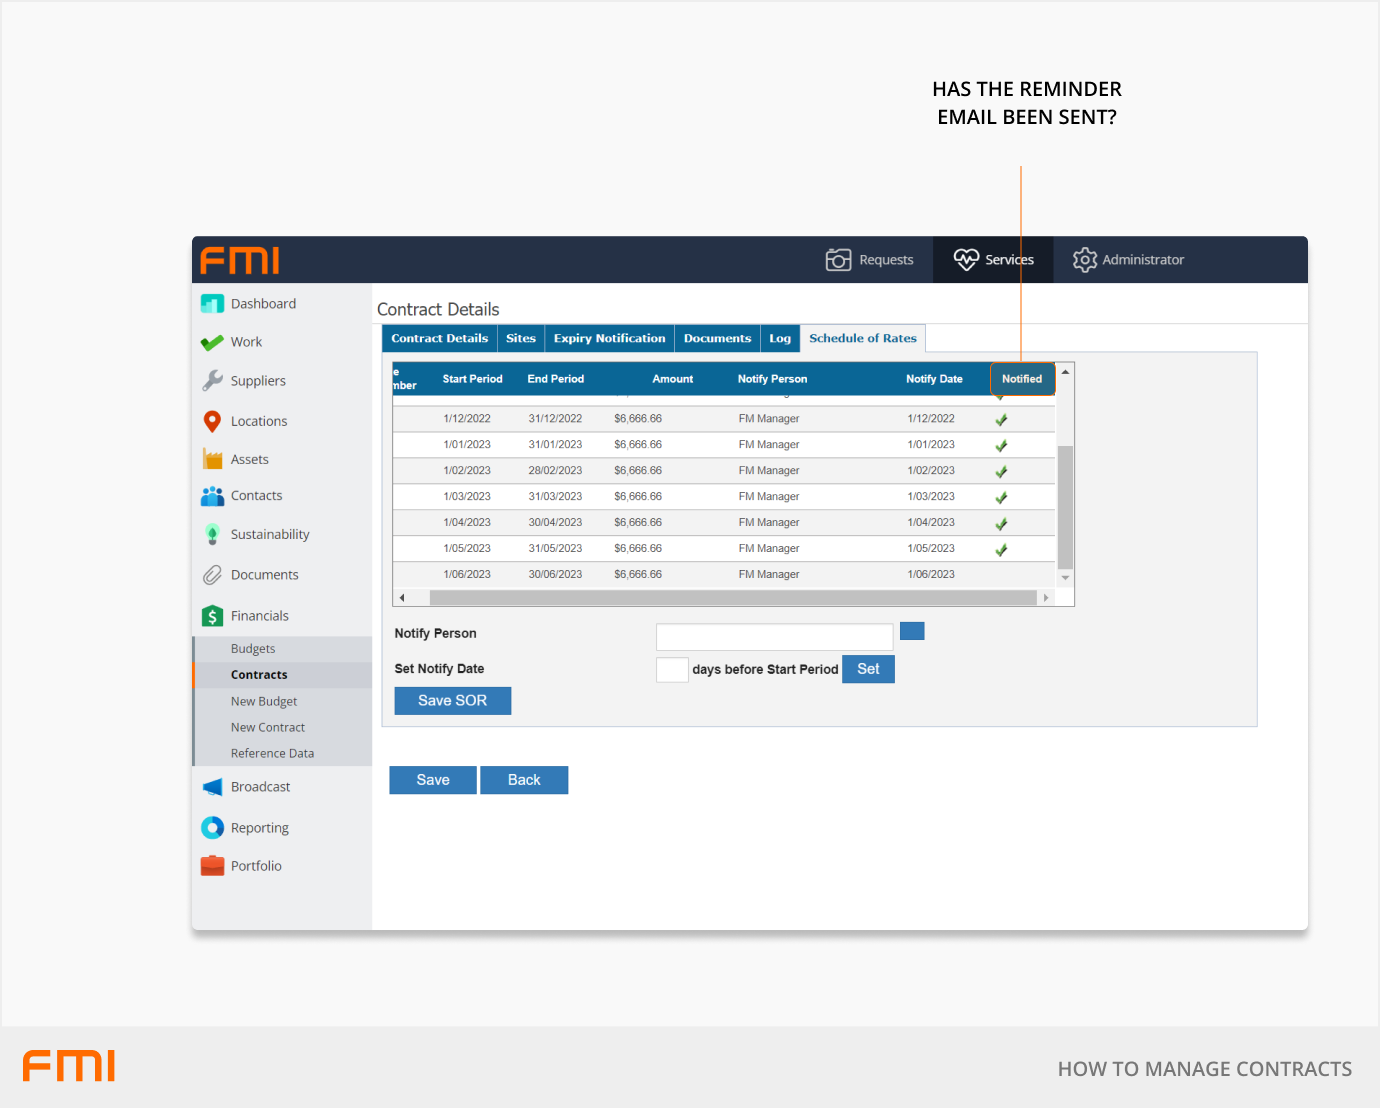
The system will record if the notified person has been sent an auto-generated reminder email for the contract amounts due for payment.
Notification of contract expiry
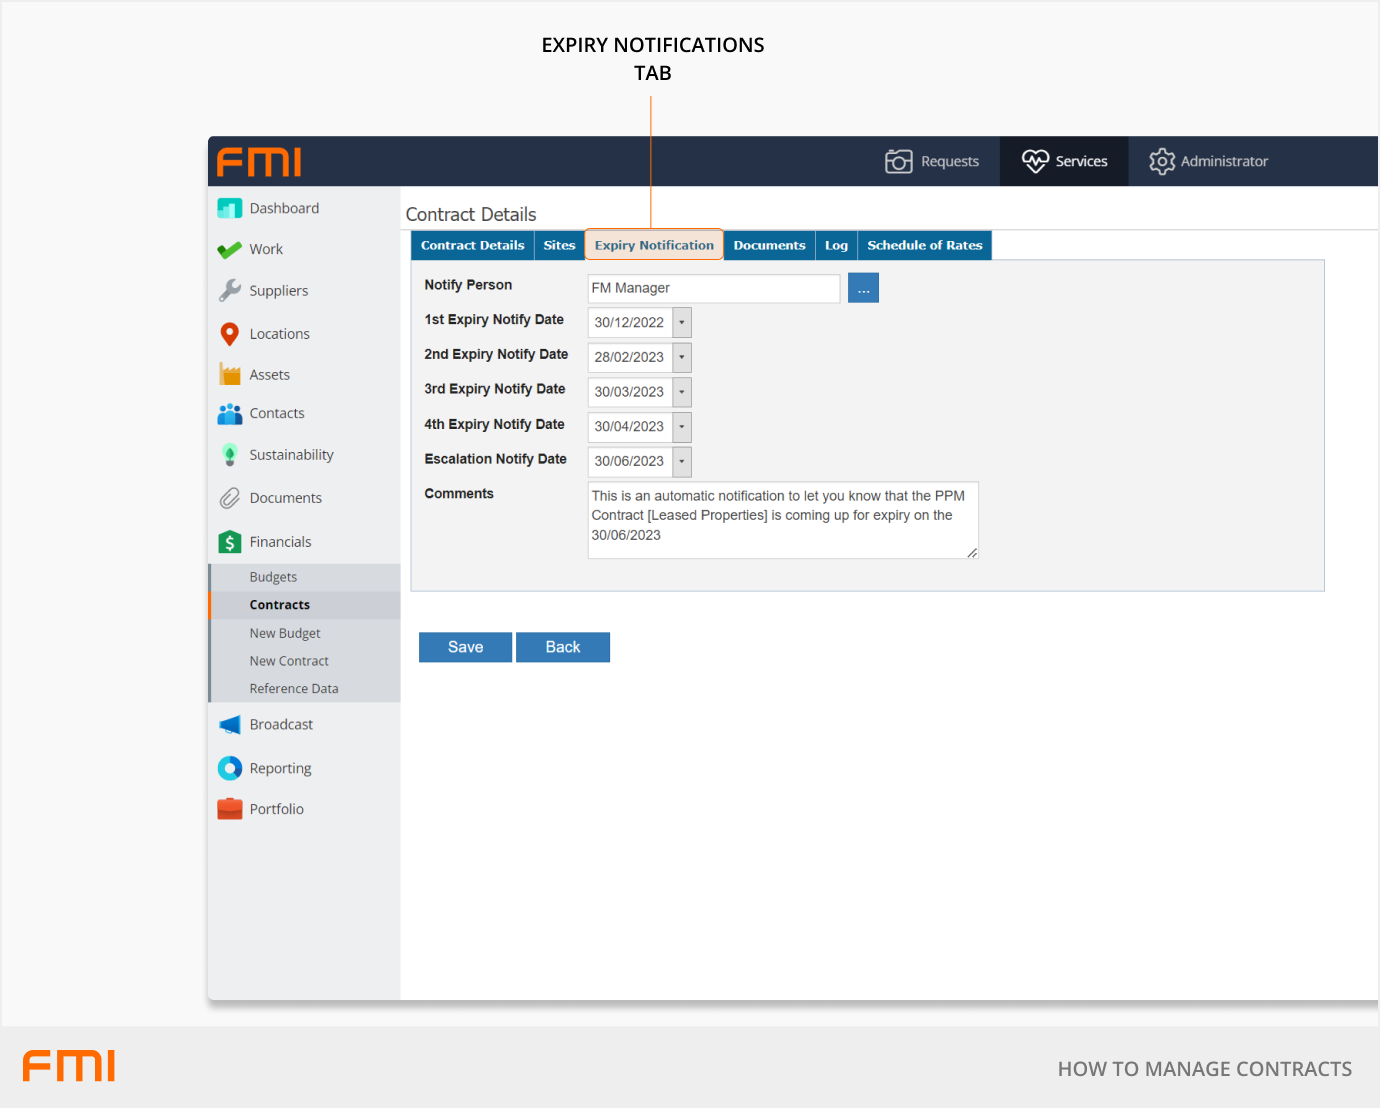
If you wish to be prompted and reminded of an upcoming contract expiry, the system will auto-generate these notification dates from the dates within the Expiry Notification tab.
In the Comments section, additional details can be added, and these will be included in the reminder emails.
Contract reminder emails
To enable the system generated email notifications there are three email templates which are associated with contract management. For further information see Email Notification Templates.