This article is for FMI Works users who have been given the permission of Works Manager
Why do I need to manage asset information?
Keeping the data in your asset register up to date can assist with:
- Ensuring compliance with regulatory requirements.
- Assisting with asset audits.
- Better data insights to identify areas of over or under investment.
- Opportunities to reduce or recoup expenditure.
Getting started
If you have not yet added the asset to your asset register, see How to Add an Asset. Once you have added base asset data, this article will show you how to enrich that data.
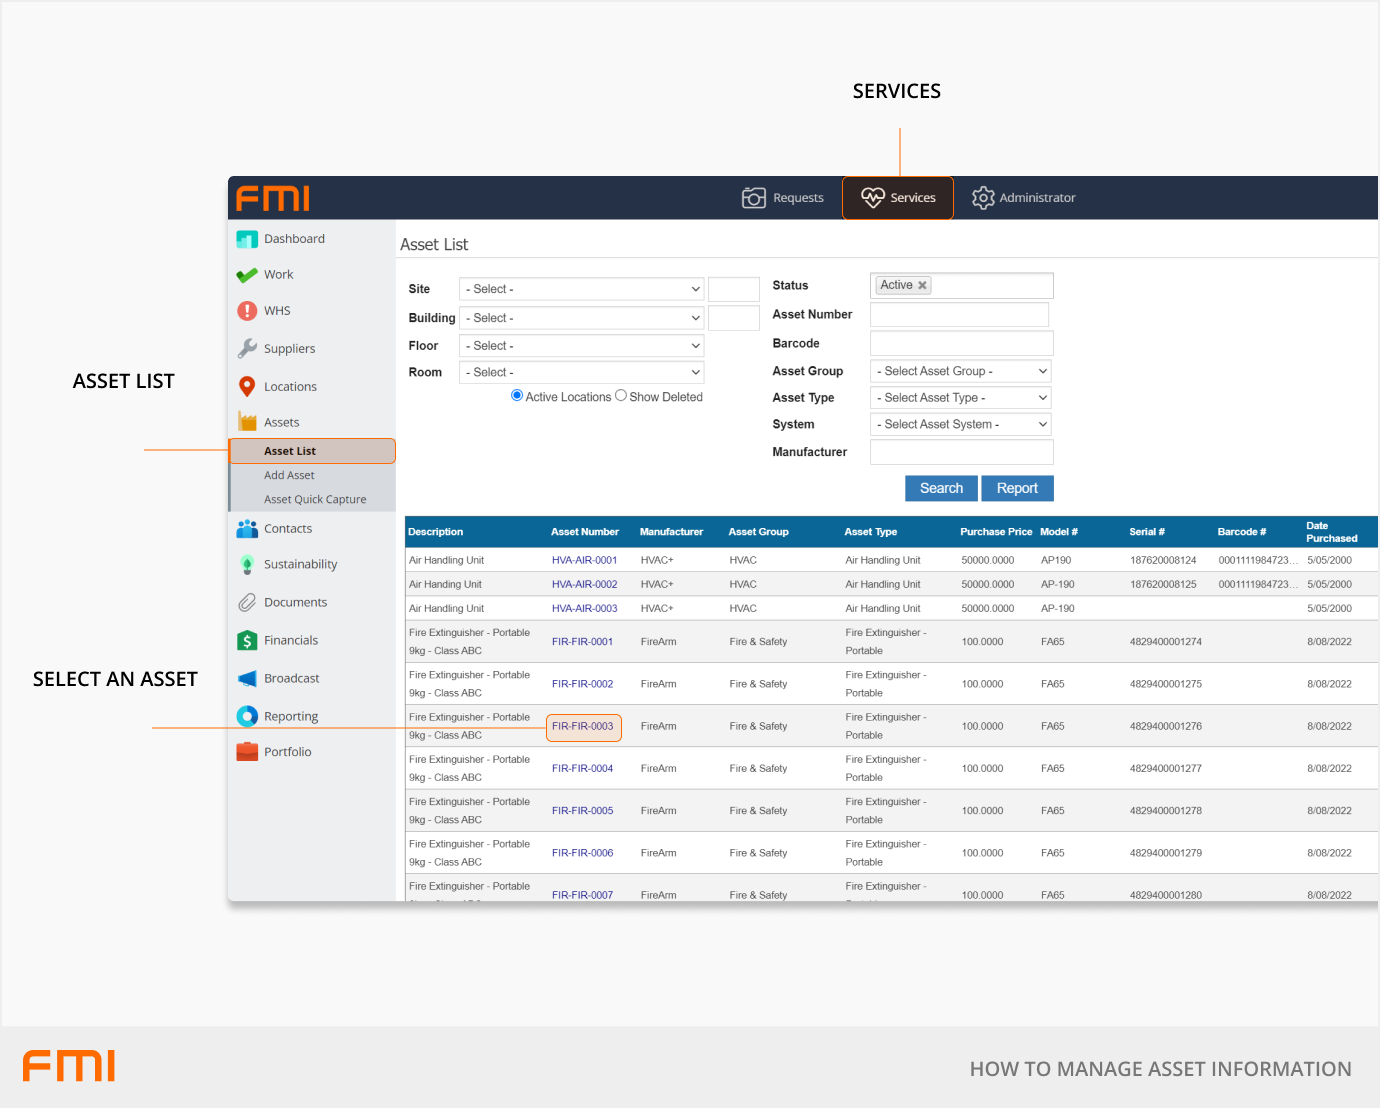
From the Services module, go to Assets > Asset List.
Use the filters to search for a specific asset or select Search to view all assets. Select the appropriate asset.
Asset details
Base asset data is stored in the Asset Details tab. There is also an option to upload an image of the asset.
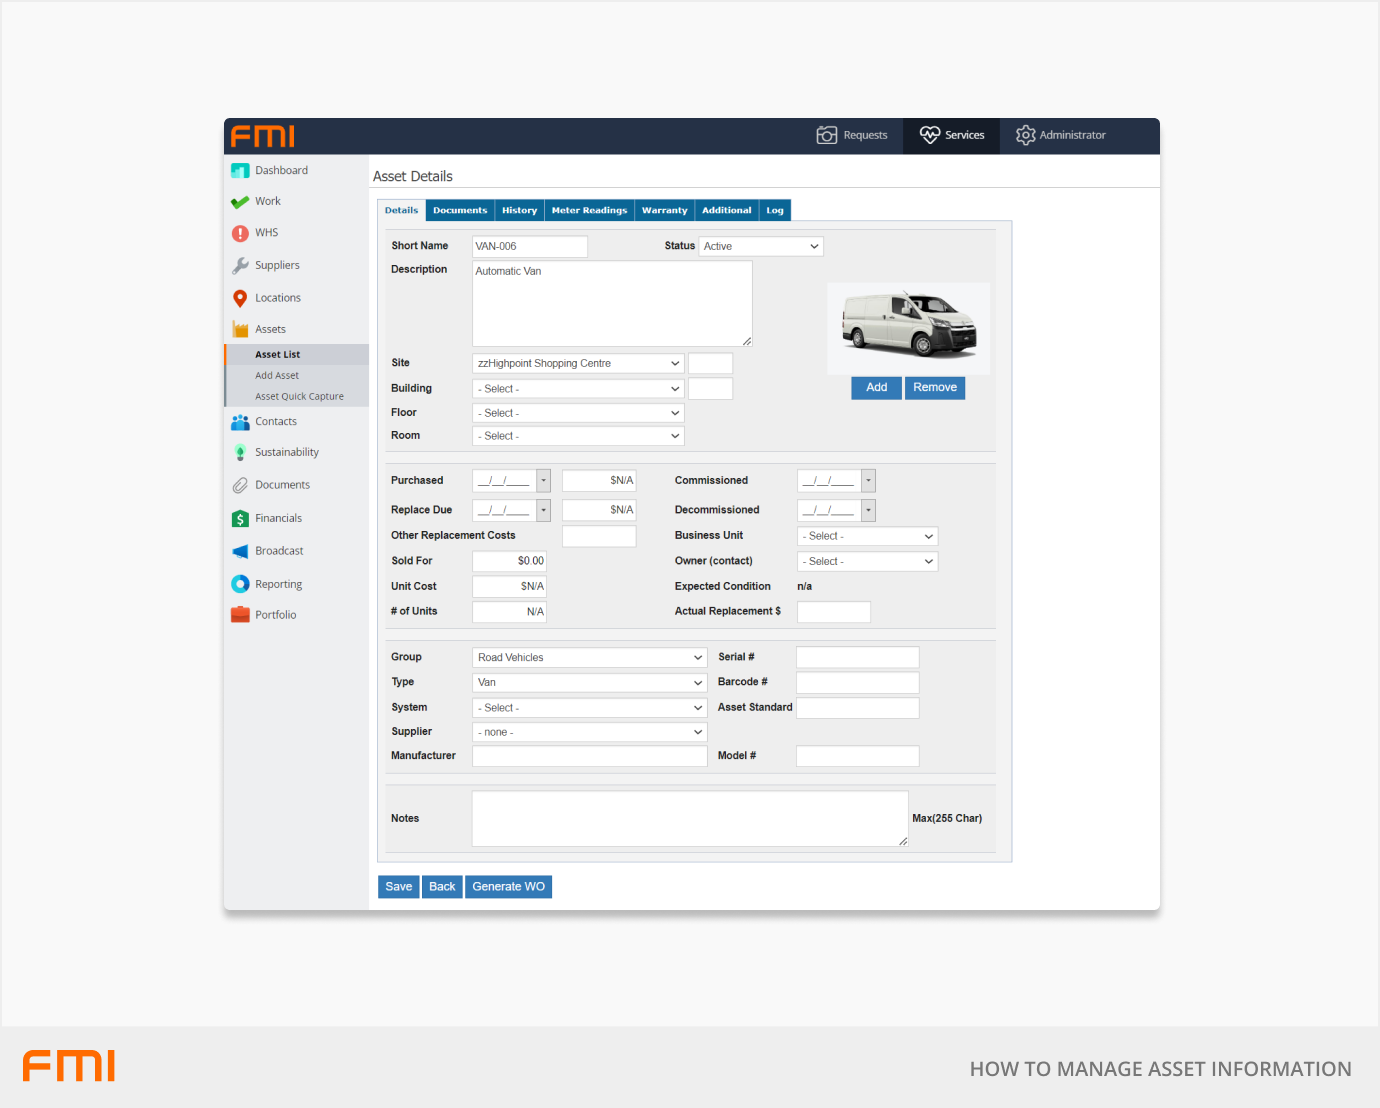
Asset description and location information
|
Field |
Details |
|
Short Name |
This field will appear if your System Administrator has not set the ‘Asset Short Name’ to generate automatically. The Short Name must be unique to the asset and will be the main identifier within FMI Works. The Short Name can contain any alphanumeric characters and digits however it must be unique. This field may appear as ‘Asset Number’ on other screens. |
|
Status |
Set the relevant Status for the asset. Options include Active, Decommissioned, Destroyed, Lost, Missing, Sold. Assets with a Status other than 'Active' will not be selectable on work orders. |
|
Description |
Enter a relevant description of the asset. |
|
Site |
Where the asset is located. It can be further expanded upon with the optional fields Building, Floor, and Room. |
|
Building |
Further narrows down the location of the asset within the Site. |
|
Floor |
Further narrows down the location of the asset within the Building. |
|
Room |
Further narrows down the location of the asset within the Floor. |
Purchasing / lifecycle planning information
|
Field |
Details |
|
Purchased |
When the asset was purchased. |
|
Replace Due |
When the asset is to be replaced. |
|
Other Replacement Costs |
Such as disposal, installation of another asset etc. |
|
Sold For |
If this asset has been sold, enter the price. |
|
Unit Cost |
Cost price of a singular unit. |
|
# of Units |
How many units there are of the asset. |
|
Commissioned |
When the asset was installed on site and when a new asset warranty date may commence. Alternatively, you can use the same date as the Purchased. |
|
Decommissioned |
When the asset reached its end of life or needs to be replaced. This field records the date the asset was physically removed from site. |
|
Business Unit |
Part of the organisational hierarchy. The owner of the asset. |
|
Owner |
The owner of the asset is associated with a known user in FMI Works. |
|
Expected Condition |
|
|
Actual Replacement $ |
The true cost to replace the asset. This will include disconnection and removal costs. |
Asset classification
|
Field |
Details |
|
Group |
Categorises what kind of asset this is. For example, Fire & Safety, Electrical Appliances, Fixtures and Fittings. |
|
Type |
Further categorises the asset within the Asset Group. For example, if the Asset Group is Fire & Safety, the Asset Type could be Smoke Detectors. |
|
System |
Part of the Asset Functional Hierarchy: Asset System > Asset Group > Asset Type. |
Other asset Information
|
Field |
Details |
|
Supplier |
Associate the asset with the supplier you purchased it from. |
|
Manufacturer |
The producer of the asset. |
|
Serial # |
Serial/identification number of the asset. |
|
Barcode # |
The asset’s barcode number. |
|
Asset Standard |
Recording the associated international or regional asset management standard, for example ISO 55000. |
|
Notes |
Free text notes about the asset. |
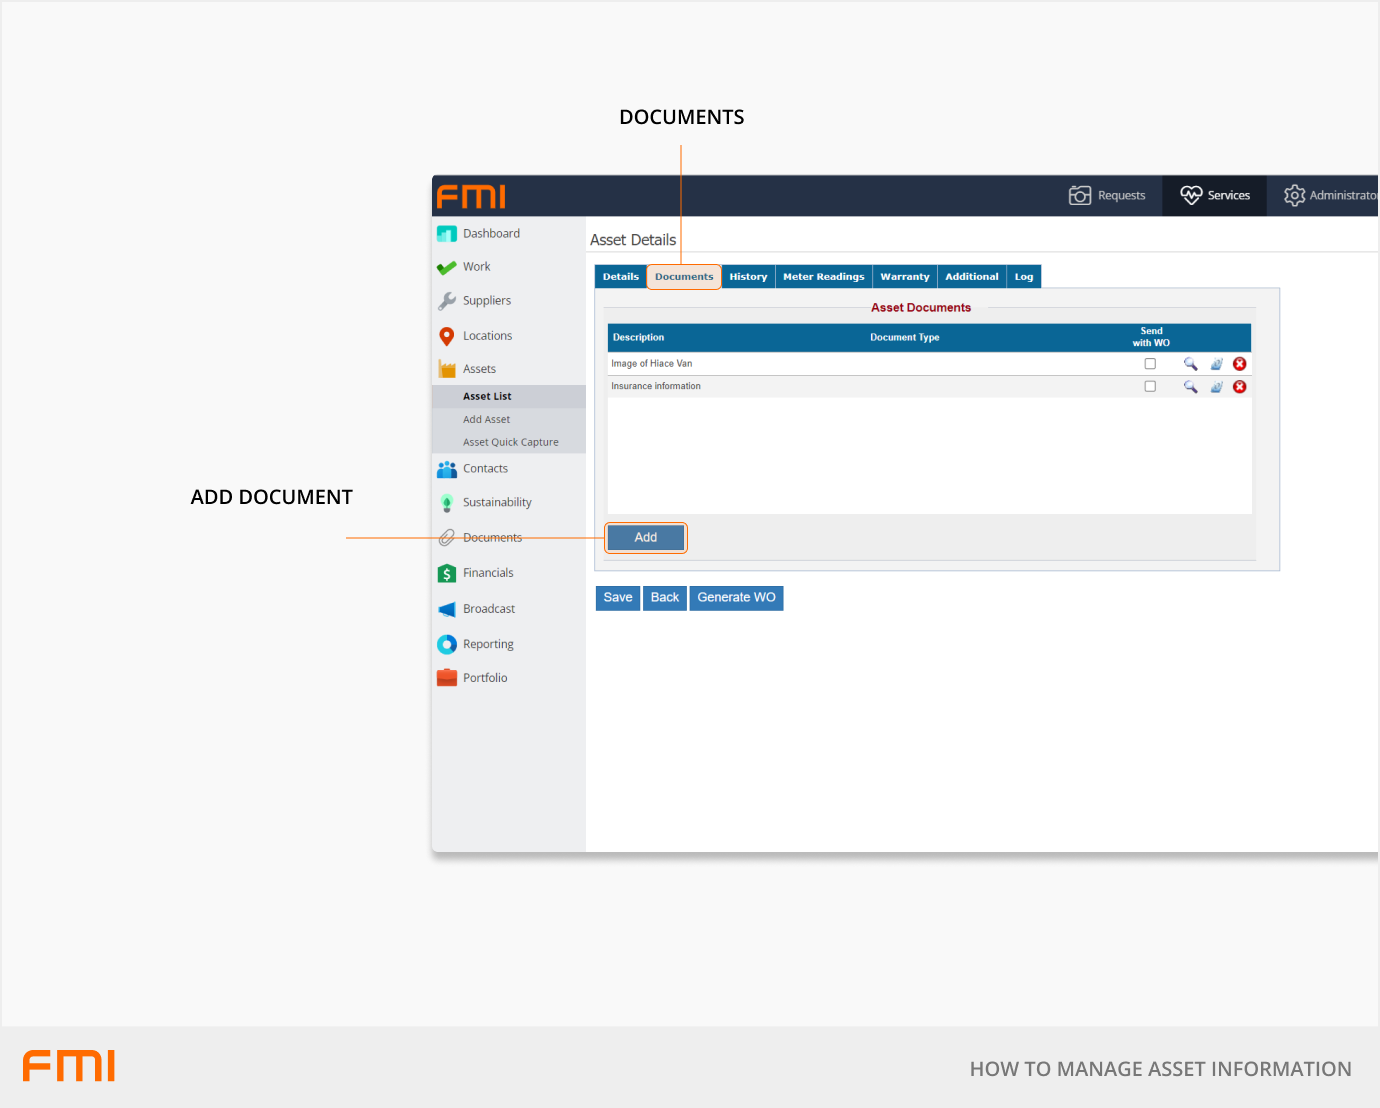
Documents
In the Documents tab, you can add documents, up to 40MB in size, relevant to the asset. You may also choose to flag these documents to be automatically sent with a work order whenever that asset is linked.
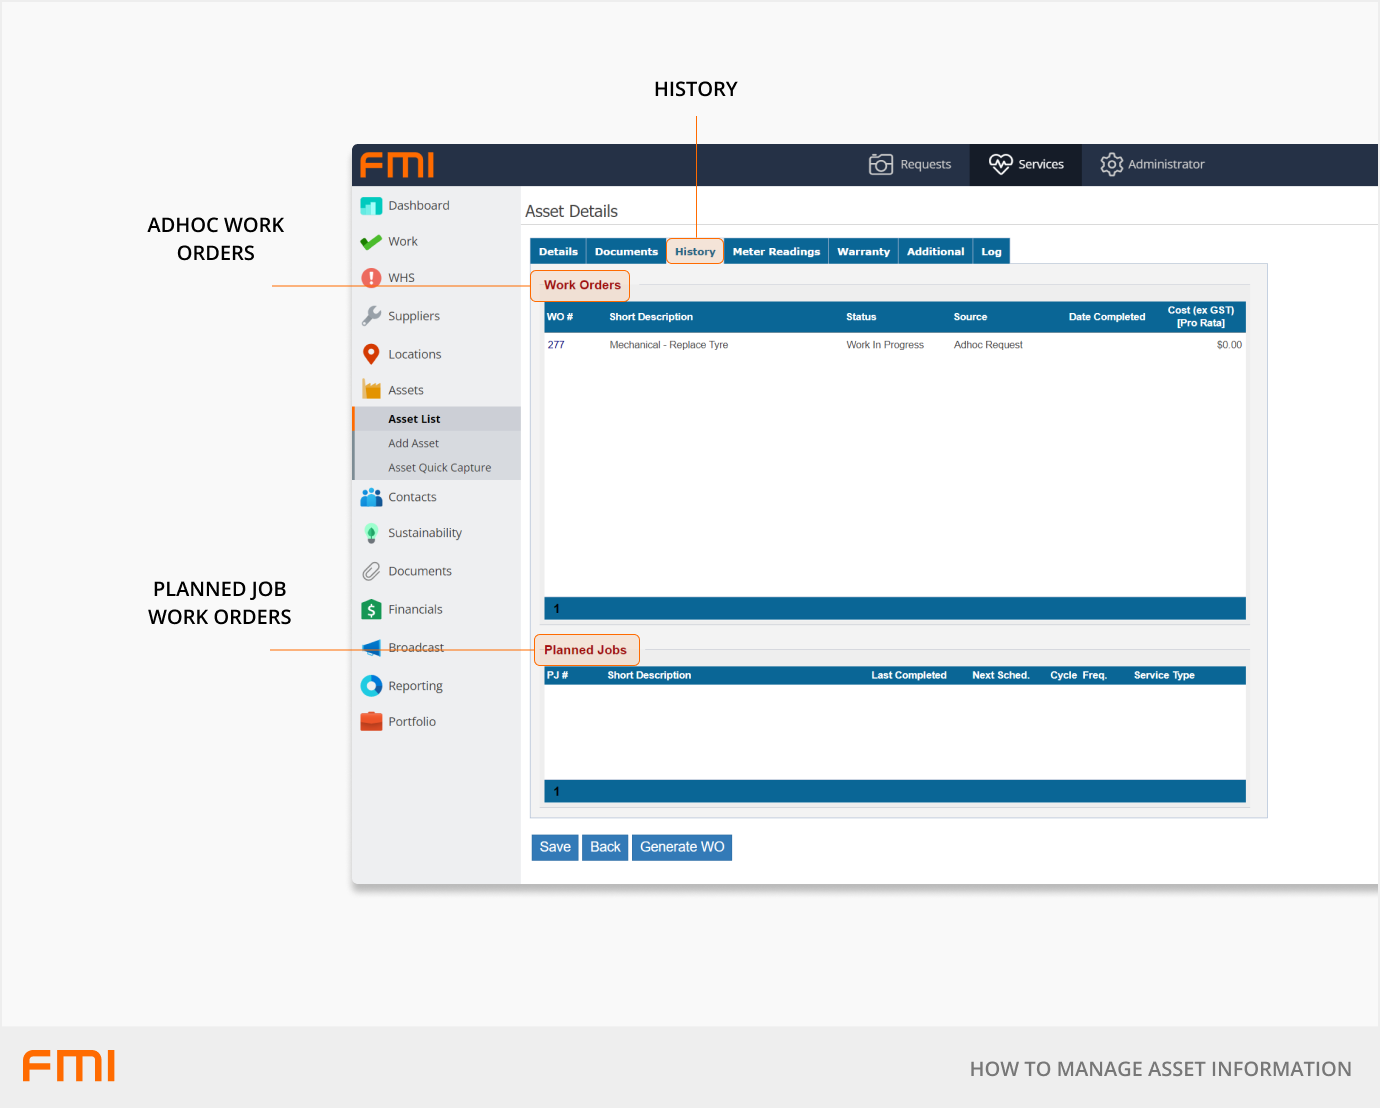
History
The History tab shows current and past work orders that the asset has been linked to.
If the asset was linked to an ad hoc work order, it will appear under Work Orders. If it was linked to a planned maintenance job, it will appear under Planned Jobs.
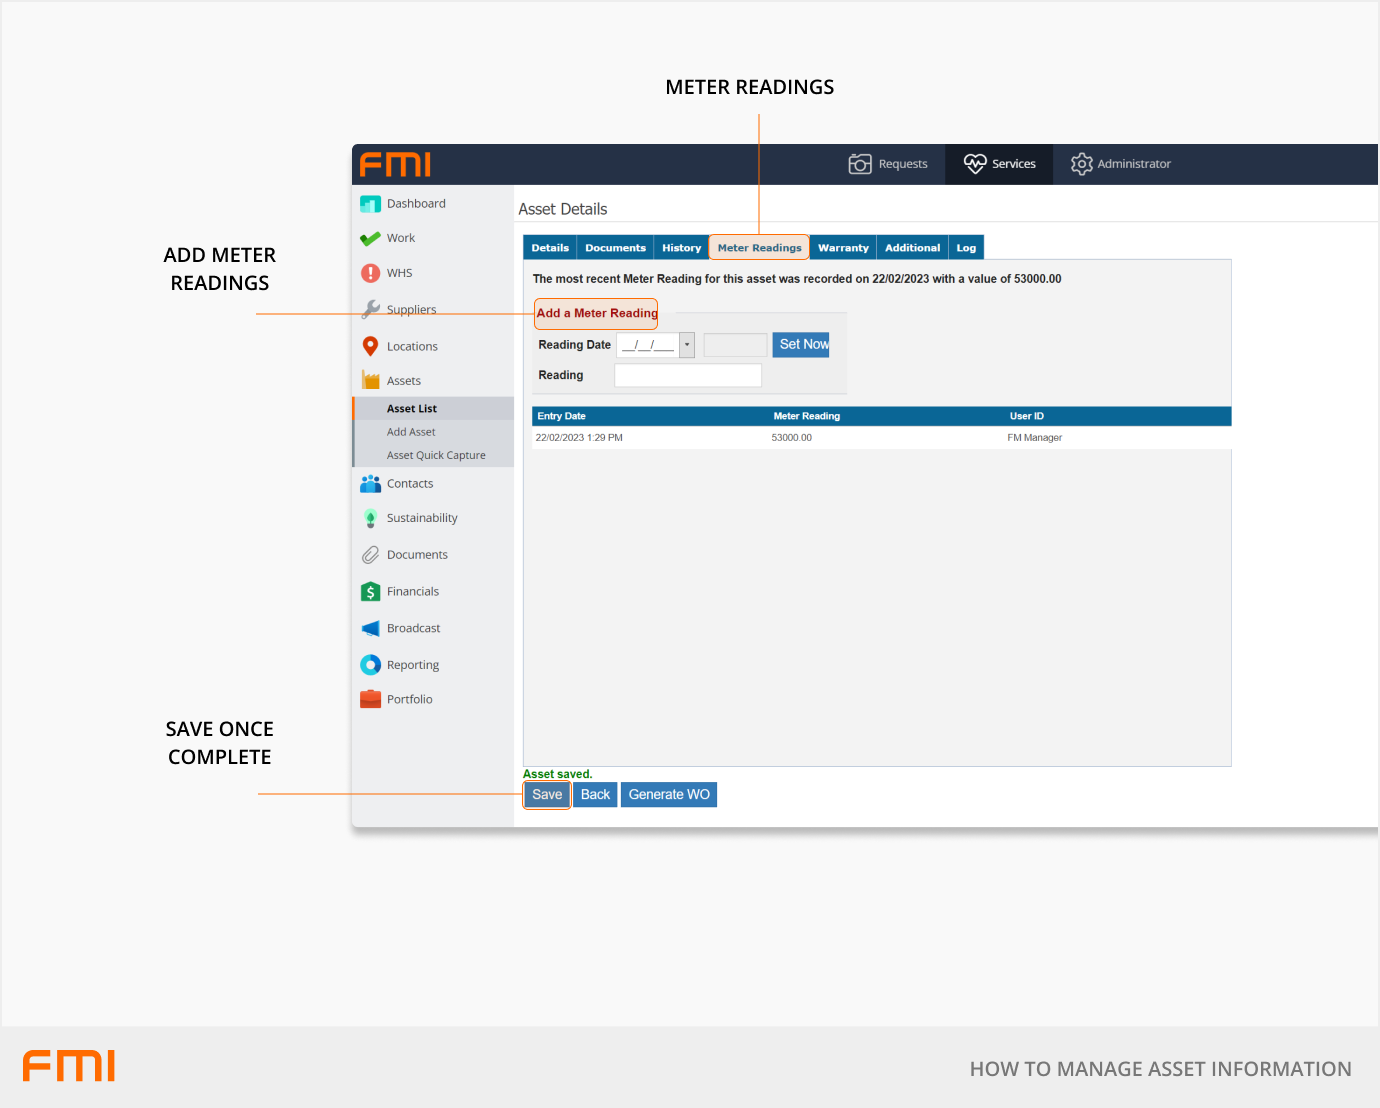
Meter readings
In the Meter Readings tab, you can record the meter readings on an asset. For example, number of running hours or odometer readings.
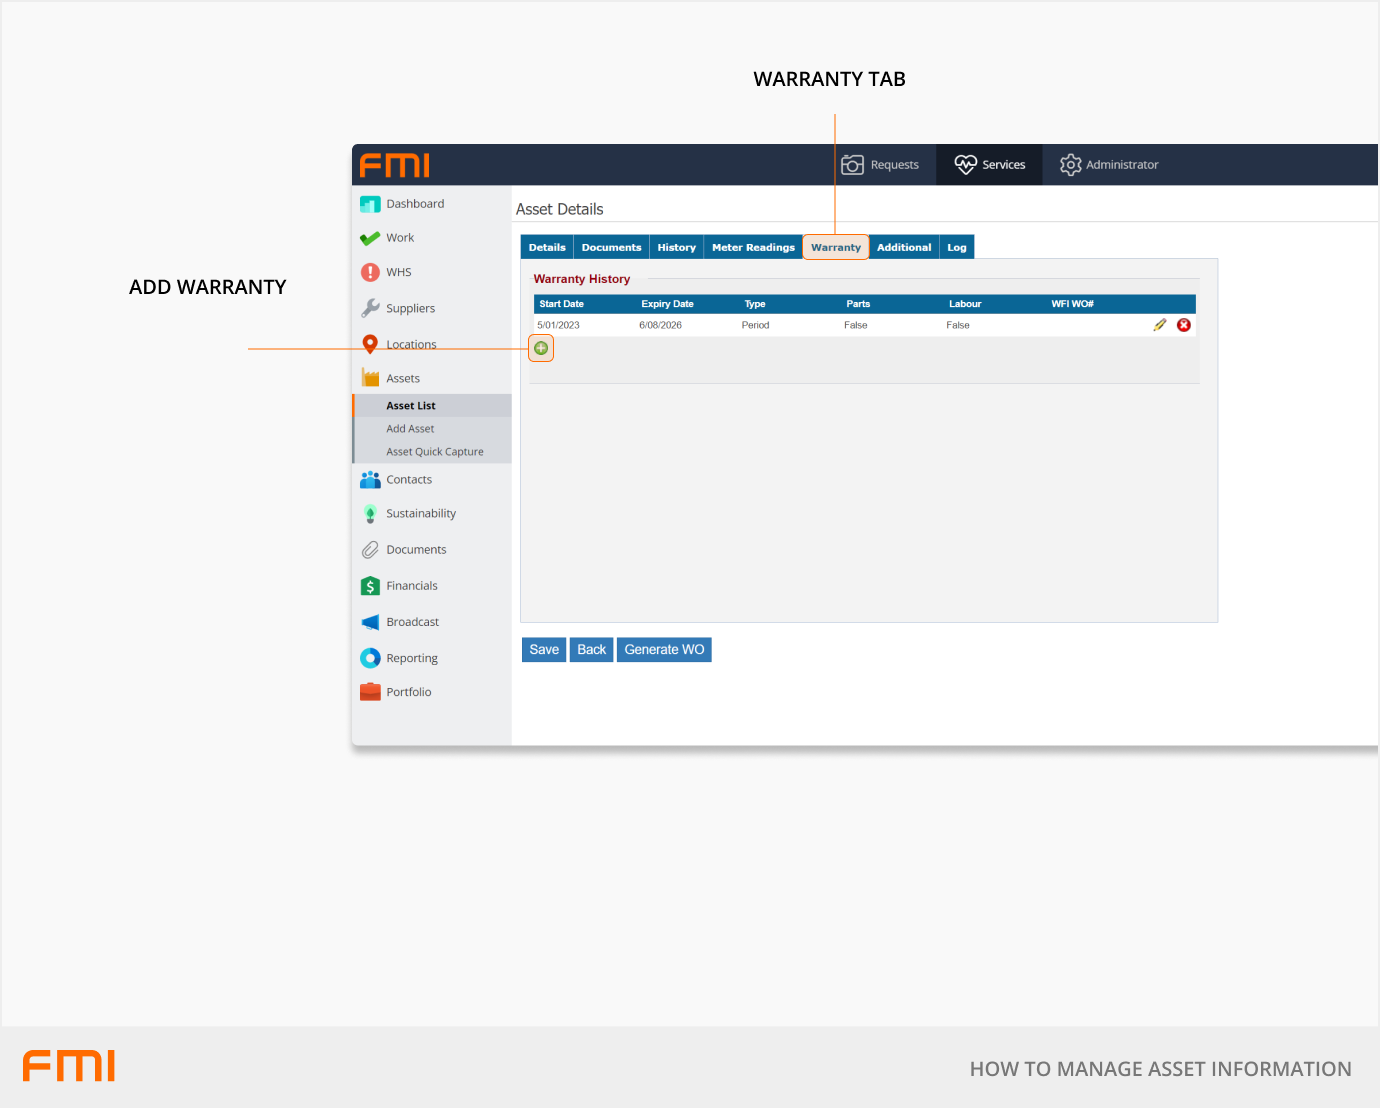
Warranty
Adding asset warranty details to the Warranty tab will help track important information and autogenerate a work order 30 days before the warranty expiry date. When the expiry date is flagged in the system, a Warranty Final Inspection (WFI) work order, with the attached asset record, will be automatically generated. The WFI work order helps organisations organise final checks and inspections before the warranty expires.
Select the green plus, and a pop-up box will appear for you to enter the warranty information.
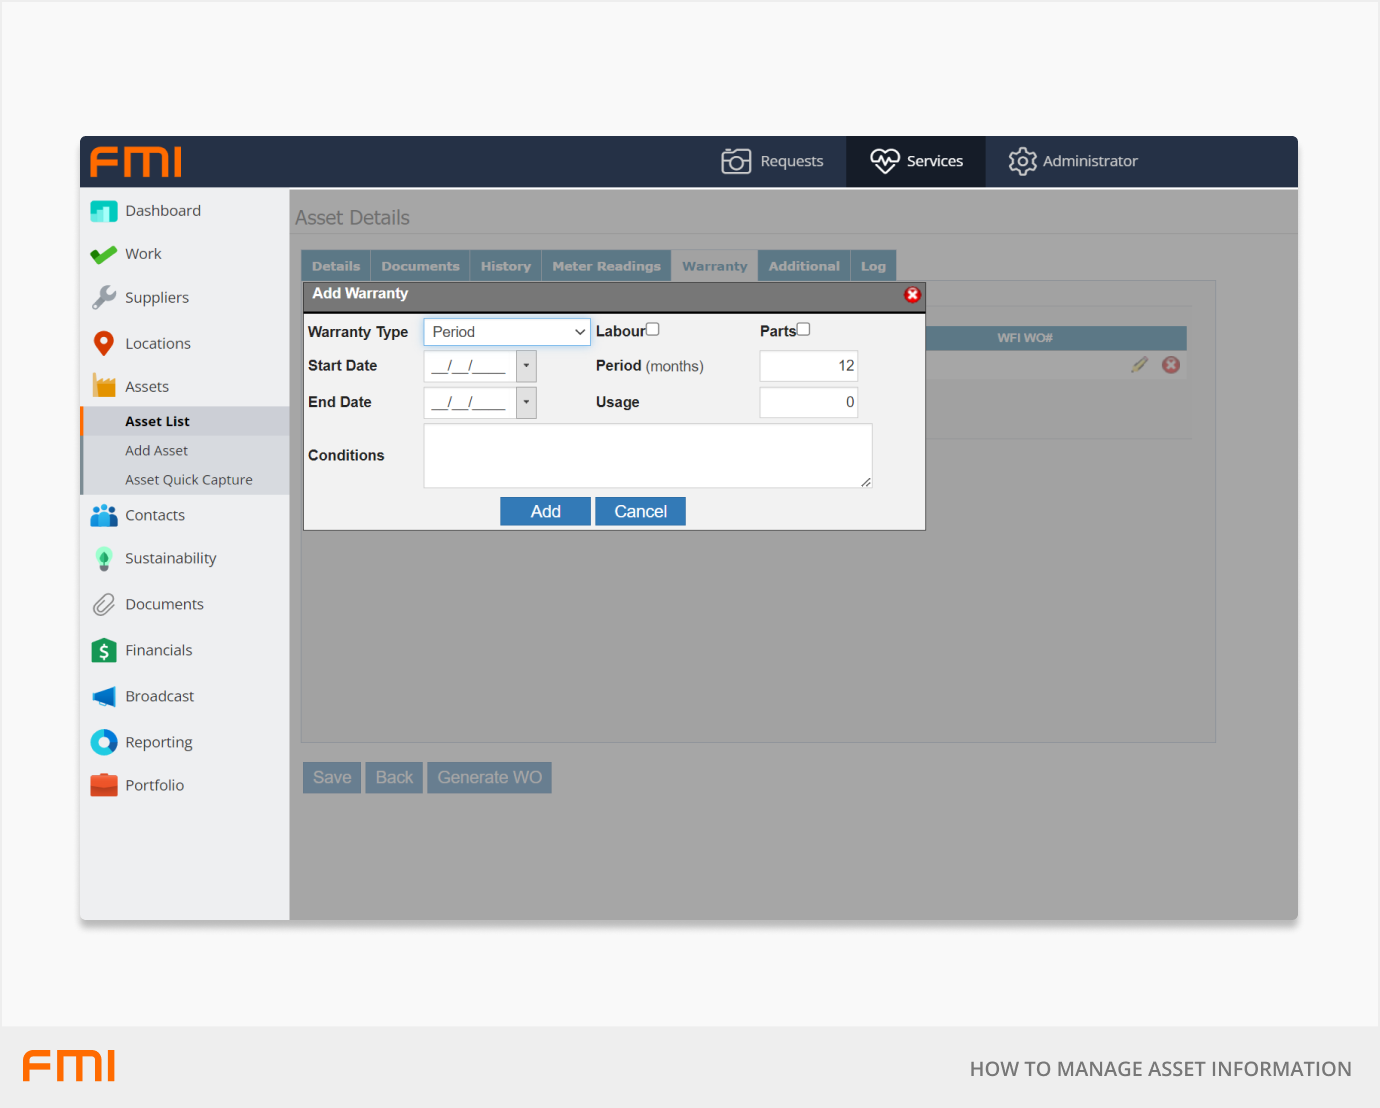
From here you can enter the following information:
- Warranty Type: Period, Usage, or Service.
- Start/End Date: Add by free typing the date or selecting it from the calendar using the down arrow.
- Labour: Select the checkbox if the warranty includes the labour cost.
- Parts: Select the checkbox if the warranty is on the asset’s parts.
- Period (months): Enter the warranty period here to auto calculate the end date.
- Usage: Enter a numerical value. For example, the number of kilometers or hours run.
- Conditions: Enter any additional information about the warranty. For example, 'This asset gets picked up for servicing'.
Select the Add button when complete.
Additional Information
There are 10 custom fields in the Additional tab where extra information relevant to the asset can be recorded.
The information entered in the additional fields will only be visible in the Asset Details page and reports that are exported into a CSV file.
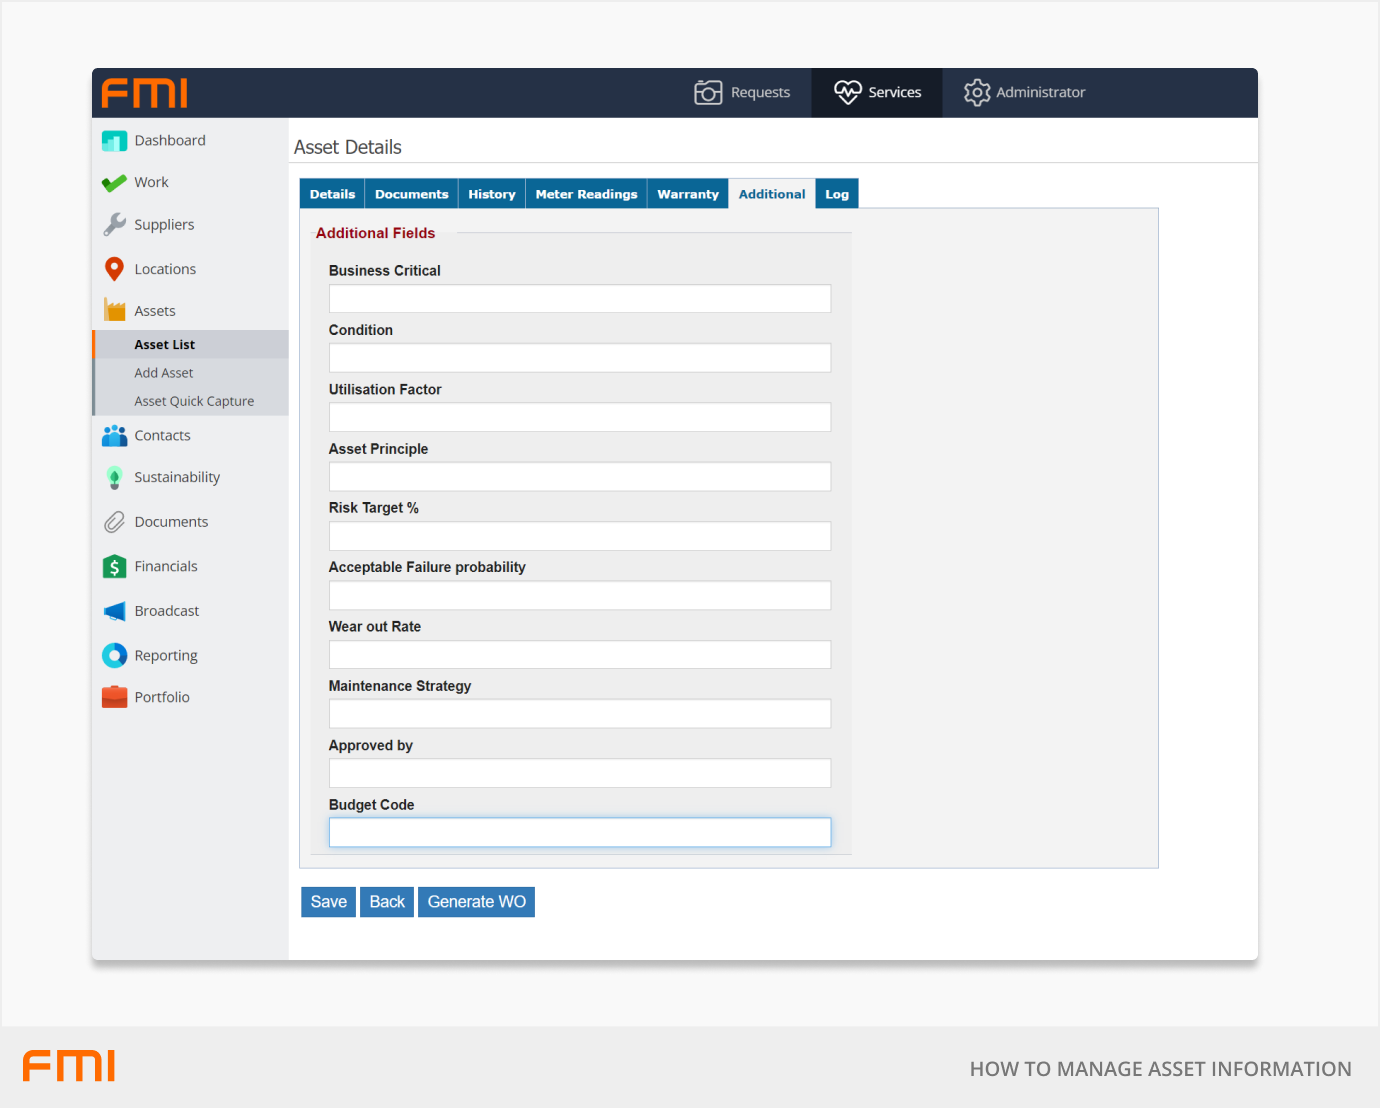
The titles of these additional fields can be edited to reflect the information you need to record.
A user with System Administrator permissions can update these field names in the Administrator module under System > Additional Fields.
From here, select the Edit button to change the field name titles.

Log
The Log tab provides an audit trail by logging all historical changes made to the asset.

More information
Getting started with your asset register? See How to Add an Asset and How to Get Started with Asset Information.
Want to update asset information in bulk? See How to Bulk Update Asset Information.