This article is for FMI Works users who have been given the permission of System Administrator
When to Use the Location Import Tool
The Location Import Tool can be used to bulk create new locations or update existing location data in FMI Works.
Check what fields you need to update
The Location Import Tool can create and/or update specific fields on the Site, Building, Floor, and Room records. A list of these fields is provided in this article below.
If a field is not available in the Location Import Template, that field will need to be manually updated on each individual record. For example, setting a site to “inactive” requires a manual update. To manually update a Site, Building, Floor or Room record, follow the instructions in Setting up Room Locations.
Check what locations you need to update
Only locations that were created using the Location Import Tool can be updated using the Location Import Tool. Locations that were manually created in FMI Works must be updated manually, following the instructions in Setting up Room Locations.
Locations that were created using the Location Import Tool will have a Location Key associated with the Site, Building, Floor or Room record. To determine which records have a Location Key, either run the Location Summary Report in CSV format or edit the site, building or floor in Services > Locations > Location Summary and check the External ID field.
Create or update records
The import process will either create or update the location record depending on the following conditions:
- Update – The Location Key matches an existing Location Key in the database.
- Create – The Location Key does not match an existing Location Key in the database.
Process Overview
There are three steps to the Location Import process:
- Download the Location Import template.
- Add data to the Location Import template.
- Import the completed Location Import template.
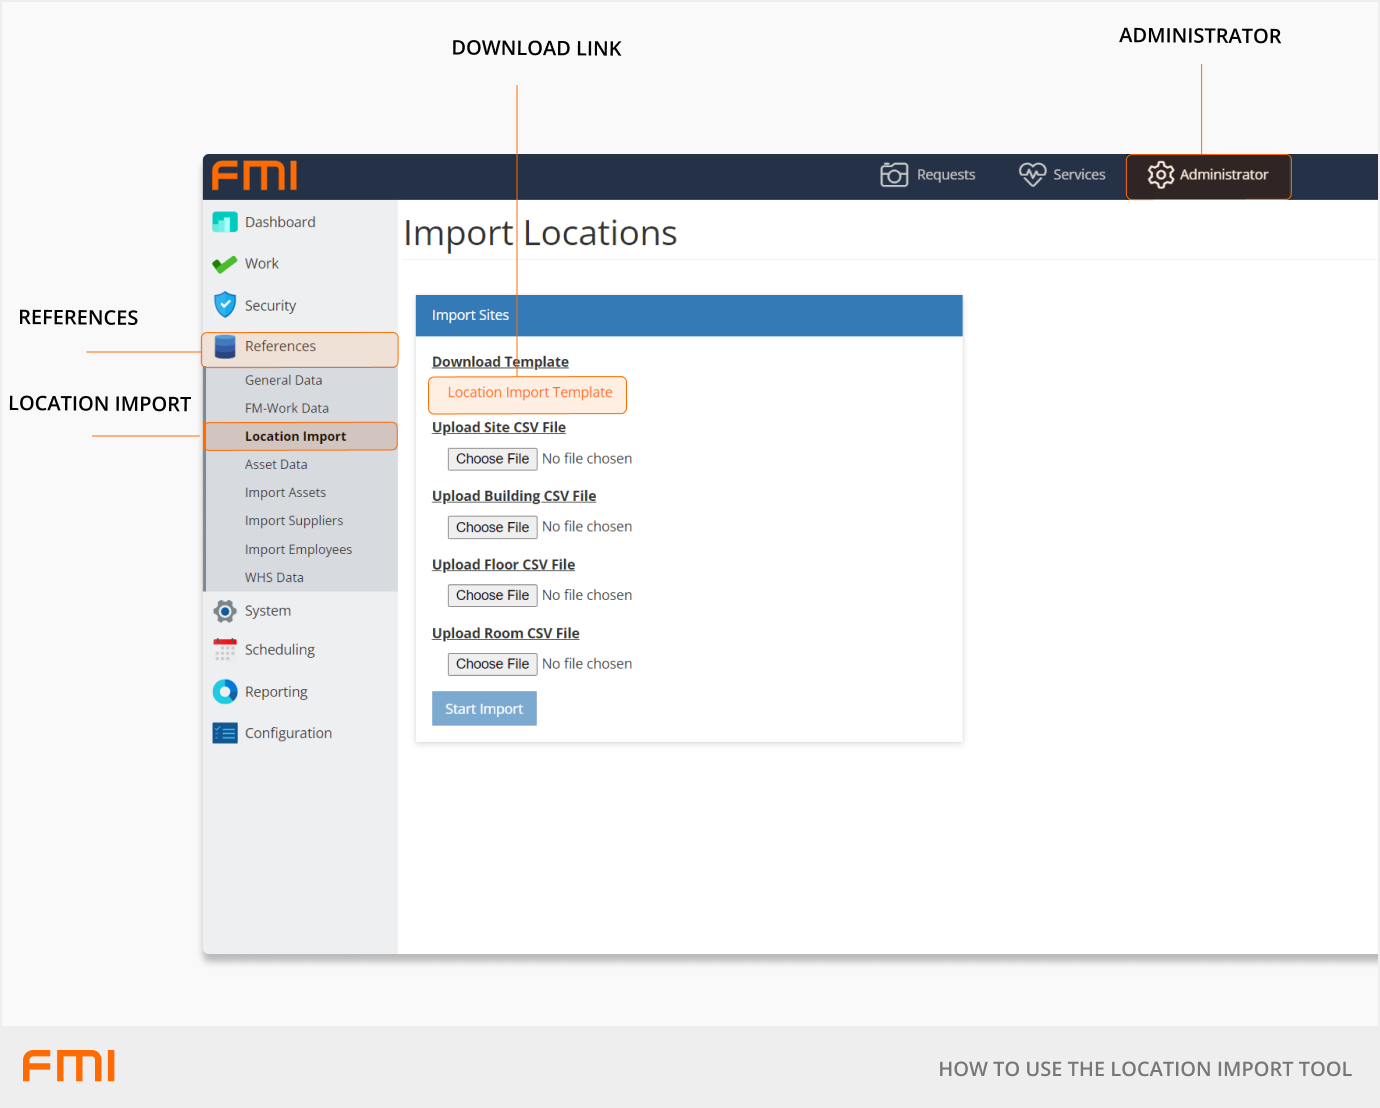
Step 1: Download the template
From the Administrator module, select References > Location Import.
Select Download Template > Location Import Template to download the excel spreadsheet template.
Step 2: Add data to the Location Import Template
Fill in the Site, Building, Floor, and Room template sheets as needed in the Location Import Template, which is an Excel spreadsheet.
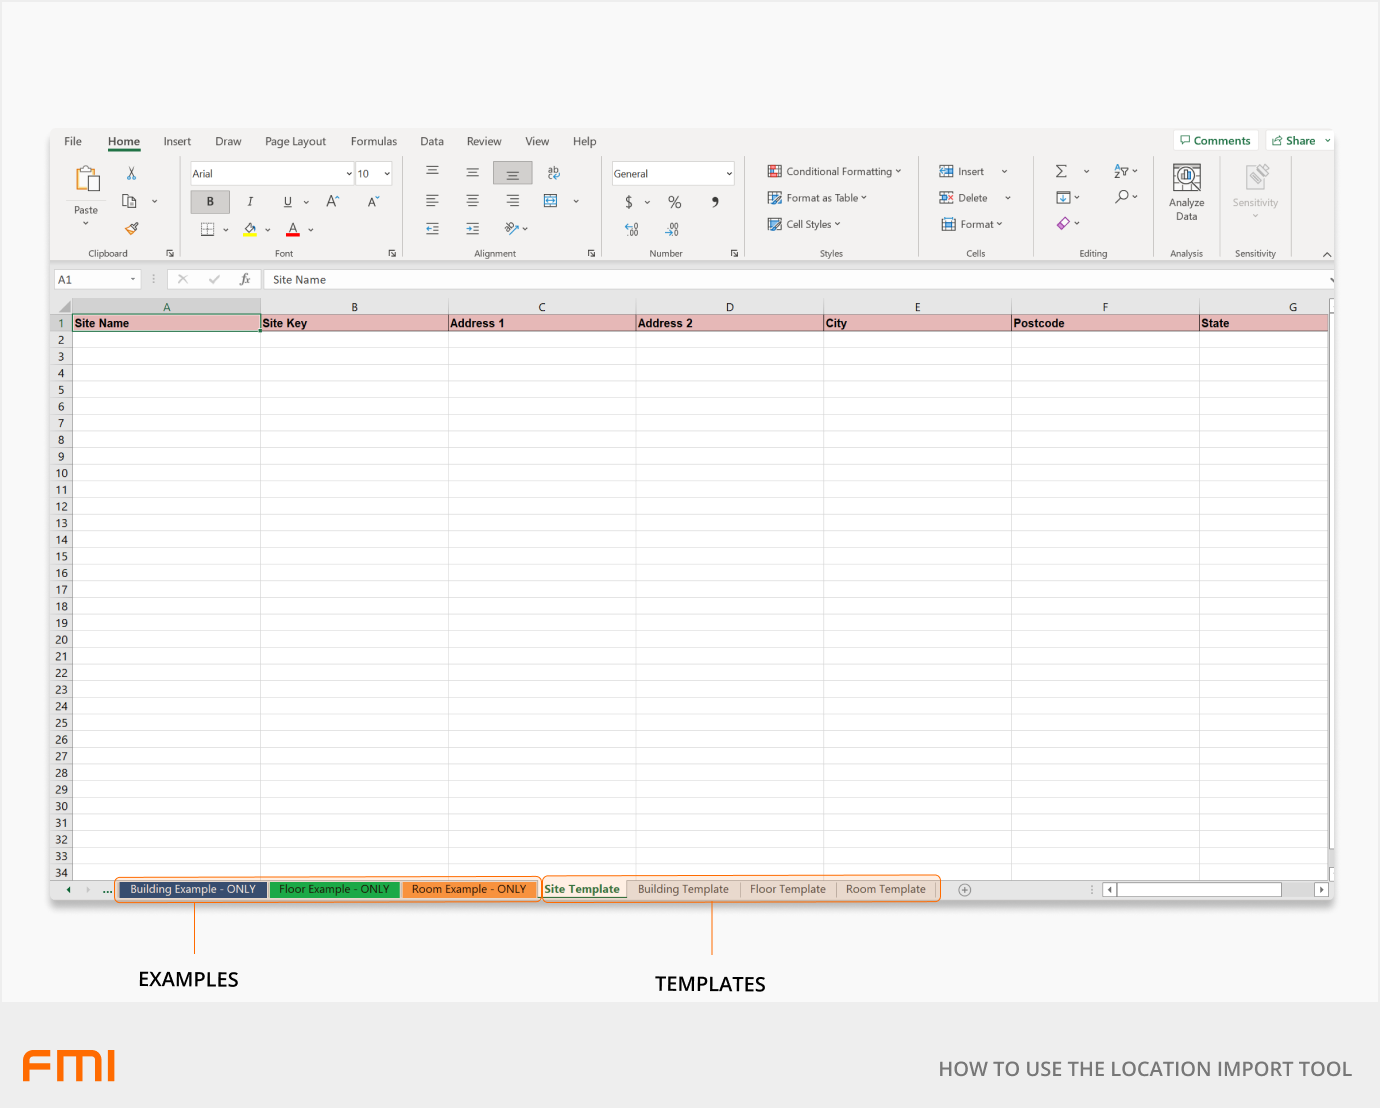
Carefully observe the import rules and conditions detailed in this article below and in the Location Import Template. If the import conditions are not met, the location will not be imported.
Important: The Site, Building, Floor, and Room Keys are required fields and must be completed. If a record does not have a Key, it was created manually and must be updated manually.
Site Fields
The Location Import requires at least 1 site record.
Required Columns
|
Site Name |
The name of the site |
Max. 100 Characters |
|
Site Key |
The site key. It must be unique to other sites e.g., SITE1 |
Max. 50 Characters
|
|
Address 1 |
The address of the site |
Max. 100 Characters |
|
City |
The city or suburb |
Max. 100 Characters |
|
State |
The name of the state |
Must be one of the following: VIC, SA, NSW, TAS, QLD, WA, NZ |
Optional Columns
|
Address 2 |
An additional field for address information |
Max. 100 Characters |
|
Post Code |
The postcode |
Max. 20 Characters |
|
Country |
The country |
Max. 100 Characters |
Building Fields
The building cannot be imported or updated without the preceding Site template data filled in.
Required Columns
|
Building Name |
The name of the building |
Max. 100 Characters |
|
Building Key |
The Building Key should be unique to other buildings at this site. It should include the site key e.g., SITE1-BLDA |
Max. 50 Characters |
|
Site Key |
This is the Site Key that this building will be associated with e.g., SITE1 |
Max. 50 Characters |
Optional Columns
|
Address 1 |
The address of the building |
Max. 50 Characters |
|
Address 2 |
An additional field for address information |
Max. 50 Characters |
|
City |
The city or suburb of the building |
Max. 50 Characters |
|
Postcode |
The postcode |
Max. 10 Characters |
Floor Fields
The Floor cannot be imported or updated without the preceding Site and Building templates filled in.
All columns are required
|
Floor/Level Name |
The name of the floor |
Max. 50 Characters |
|
Floor Key |
The Floor Key should be unique to other floors in this building. It should include the Building Key e.g., SITE1-BLDA-LV1 |
Max. 50 Characters |
|
Building Key |
This is the Building Key that this floor will be associated with e.g., SITE1-BLDA |
Max. 50 Characters |
Room Fields
The Room cannot be imported or updated without the preceding Site, Building, and Floor templates filled in.
Required Columns
|
Room Name |
The room name or number |
Max. 100 Characters |
|
Floor Name |
The floor name that this room is located on |
Max. 50 Characters |
|
Room Key |
The Room Key should be unique to other rooms on this floor. It should include the building key e.g., SITE1-BLDA-LV1-RM1 |
Max. 50 Characters |
|
Floor Key |
The Floor Key is the floor that this room will be associated with e.g., SITE1-BLDA-LV1 |
Max. 50 Characters |
Optional Fields
|
Local Name |
The local name is an additional naming option for the room. It is used as a common identifier for the room e.g., Kitchen, Toilet, Meeting Room. |
Max. 100 Characters |
Step 3: Import the completed template
After all four tabs of the spreadsheet have been updated as needed, each of the Site, Building, Floor, and Room sheets must be saved to individual CSV files by following these steps:
- Go to the Site Template sheet and select all columns. Copy and paste the data into a new Excel spreadsheet and select Save As.
- Give the file an appropriate name (e.g., Sites) and select to save the file as CSV (Comma delimited) (*.csv).
- Repeat this process for each of the Building Template, Floor Template, and Room Template.
From the Administrator module, select References > Location Import.
Select Choose File to upload CSV files for Site, Building, Floor and Room. All four CSV files must be selected for an import to be successful.
Select Start Import.
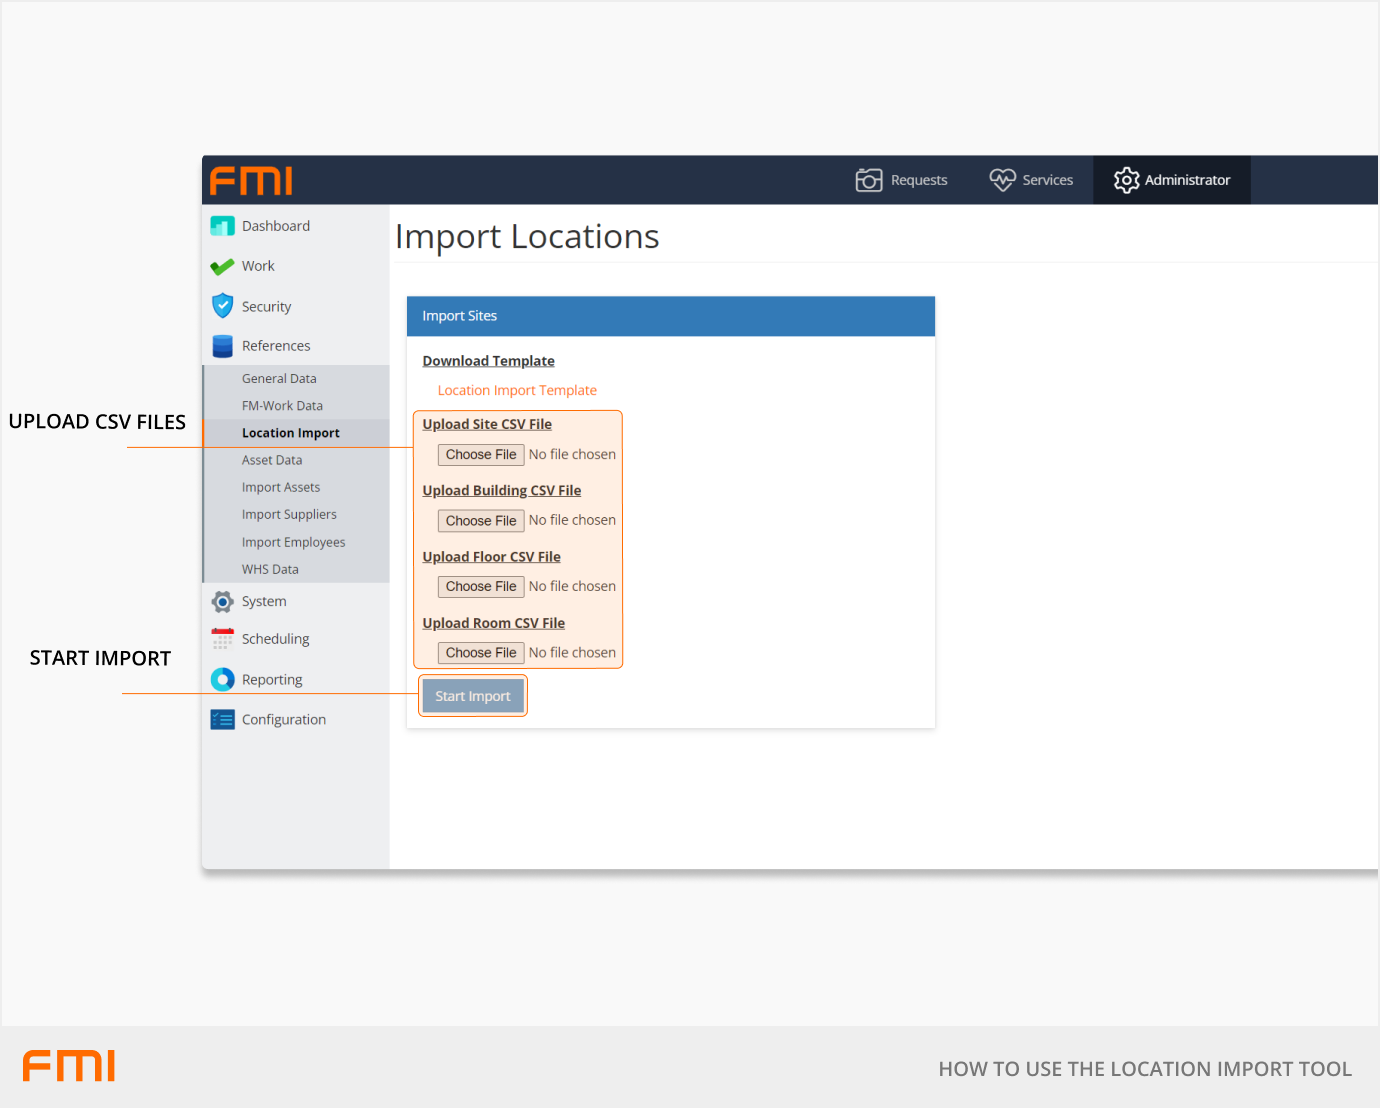
A confirmation message will display if the import is successful.
Tips for using the Location Import Tool
- The Location Import Tool requires users to have a basic knowledge of Excel.
- We recommend that you use a small sample set of data when using the Location Import tool for this first time. This will enable you to review the changes to ensure they align with what you are trying to achieve.
- Location records can be updated individually through the user interface if desired, rather than using the Location Import Tool. For more information, see articles: